


FEATURES
The Attwood Ski Mirror is designed with a universal mount which
allows mounting on either the dash or windshield extrusion (up to
3/4" thick). It adjusts freely to any position, any angle, up or down
or side to side.
The design includes a shatterproof convex lens that eliminates blind
spots. It is compact and lightweight.
The spring-loaded ball joint holds mirror firm to prevent vibrating out
of position.
Also features gleaming ZAMAK with Perma-Plate
®
chrome finish.
DASH-MOUNTED SKI MIRROR
Tools and Materials Required for Installation
1.Drill and drill bits.
2.Two #10 x 3/4" stainless steel wood/sheet metal pan-head screws
(not included).
3.Phillips Head screwdriver.
INSTALLATION INSTRUCTIONS
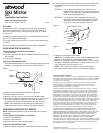
1.Select a desirable location at or near centerline of the boat, making
sure there is enough room to work before drilling. (Figure 1)
2.Mark the hole locations using the base as a template.
3.Drill two suitable sized holes.
4.With mirror in place, use two #10 screws and fasten to dash.
5.After mirror is mounted, adjust to desired position. If mirror cannot
be adjusted sufficiently, rotate the mirror head one-half turn.
(The mirror may need to be removed from the dash to do so.)
NOTE: Mirror head tension does not require adjustment; a
permanent tension system is built in and preset by Attwood.
WINDSHIELD-MOUNTED SKI MIRROR
NOTE: Windshield installation is
not
recommended for frameless
windshields.
Tools and Materials Required for Installation
1.Phillips Head screwdriver.
2.Optional metal cutting file.
3.Optional aluminum, plastic, plywood spacer.
INSTALLATION INSTRUCTIONS
1.Select a desirable location at or near centerline of the windshield.
2.Loosen the two screws in the clamping bracket, then place it over
the windshield frame and mirror base at the selected location.
(Figure 2)
OPTION 1 For windshield frames less than .450" thick, or a
stepped frame (Figure 3), a small spacer of aluminum,
plastic, or marine plywood may be used between the
base and the windshield frame.
OPTION 2 For windshields with a stepped frame (Figure 3),
using the mounting bracket as a template, mark the
width of the bracket on the windshield frame step.
Using a file, remove the step from this area.
Ski Mirror
9083
Installation Instructions
SAVE THESE INSTRUCTIONS
Form Number 69212T Rev. B 03-10
3
®
ATTWOOD LIMITED WARRANTY
Attwood Corporation, 1016 North Monroe, Lowell, Michigan 49331 (“Attwood”) warrants
to the original consumer purchaser that Attwood brand products will be free from defects
in materials and workmanship under normal use and service for one year from the date
of original consumer purchases.
This limited warranty is not applicable if the product has been damaged by accident,
improper installation, unreasonable or improper use, lack of proper maintenance,
unauthorized repairs or modifications, normal wear and tear, or other causes not
arising out of defects in materials or workmanship.
Attwood products are warranted for use on pleasure boats. Any other use – including
but not limited to commercial, racing, or non-marine use – are not covered under this
warranty. Attwood’s obligation under this warranty is limited to repair of the product at
Attwood’s plant or replacement of the products at Attwood’s option without expense to
the original consumer purchaser. Any expenses involved in the removal, reinstallation
or transportation of the product are not covered by this warranty. The product must be
returned to Attwood’s plant at the address above, postage pre-paid, and insured with
proof of original purchase including date. If Attwood is unable to replace the product and
repair is not commercially practical or cannot be timely made, or if the original consumer
purchaser is willing to accept a refund in lieu of repair or replacement, Attwood may
refund the purchase price, less an amount for depreciation. The acceptance by Attwood
of any product returned or any refund provided by Attwood shall not be deemed an
admission that the product is defective or in violation of any warranty. Products that
are replaced or for which a refund is issued become the property of Attwood.
THIS WARRANTY IS ATTWOOD’S ONLY EXPRESSED WARRANTY OF THESE
PRODUCTS. NO IMPLIED WARRANTY INCLUDING, WITHOUT LIMITATION, THE
IMPLIED WARRANTIES OF MERCHANTABILITY AND FITNESS FOR A PARTICULAR
PURPOSE, SHALL BE EXTENDED BEYOND THE WARRANTY PERIOD STATED
ABOVE FOR EACH PRODUCT. ATTWOOD SHALL NOT BE LIABLE FOR ANY
DAMAGES, FOR LOSS OF USE OF THIS PRODUCT, NOR FOR ANY OTHER
INCIDENTAL OR CONSEQUENTIAL DAMAGES, COSTS, OR EXPENSES.
Some states do not allow limitations or how long an implied warranty lasts or the exclusion
or limitation of incidental or consequential damages, so the above limitations and exclusions
may not apply to you. This warranty gives you specific legal rights, and you may have
other rights which vary from state to state.
Figure 1
Tighten
Screws
Center of Dash
Adjust
Figure 2
Tighten
Screw
Adjust
Windshield Frame
Figure 3
StepStep
3.Tighten two clamping bracket screws.
CAUTION: Overtightening the screws could cause damage to the
threads, clamping bracket, windshield/windshield frame.
4.After mirror is mounted, adjust to desired position. If mirror cannot
be adjusted sufficiently, rotate the mirror head one-half turn. (The
mirror may need to be removed to do so.)
NOTE: Mirror head tension does not require adjustment; a
permanent tension system is built in and preset by Attwood.
© 2003 Attwood Corporation
1016 N. Monroe Street, Lowell, MI 49331-0260 www.attwoodmarine.com