


9
308883
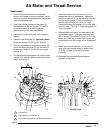
Displacement Pump Service
D Be sure you have all necessary parts on hand
before you start. If using a repair kit, use all the
parts in the kit for the best results.
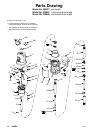
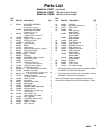
D Displacement Pump Repair Kit 241623 is available.
Parts included in the kit are marked with a
dagger (
[) in the parts drawing and list.
WARNING
To reduce the risk of serious injury whenever you
are instructed to relieve pressure, always follow the
Pressure Relief Procedure on page 7.
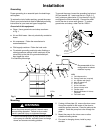
1. Flush the pump.
2. Relieve the pressure before you proceed.
3. Disconnect the hoses, remove the pump from its
mounting, and clamp the air motor base (5) in a
vise.
CAUTION
To avoid damaging the shovel tube, do not use
slots in the tube to tighten or loosen tube.
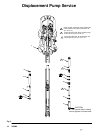
4. Use strap wrench to screw shovel tube (67) off of
pump cylinder (59).
5. Use strap wrench to screw shovel (66) off of
shovel rod (58).
6. Use strap wrench on pump cylinder (59) to screw it
out of extension tube (64). Screw tube connector
(63) out of pump cylinder. Remove bearing (61)
and seal (62).
7. Screw the shovel rod (58) out of the piston (52).
Remove the lower ball (56). Screw the piston out
of the extension rod (57). Remove the upper ball
(56), retaining washer (53), and seal (54).
8. Clean all the parts in a compatible solvent and
inspect them for wear or damage. Use all the
parts in the repair kit, and replace other parts as
necessary.
9. Generously lubricate all the parts with light
water-resistant grease and reassemble the pump.
NOTES:
Torque the shovel tube (67) to the pump cylinder
(59) at 45 to 55 ft-lb (61 to 75 N-m), and torque the
pump cylinder (59) to the extension tube (64) at
45 to 55 ft-lb (61 to 75 N-m).
Torque the shovel rod (58) to the piston (52) at 25
to 30 ft-lb (34 to 41 N-m), and torque piston (52) to
the extension rod (57) at 25 to 30 ft-lb (34 to 41
N-m).
10. If the ground wire was disconnected before
servicing, be sure to reconnect it before you
operate the pump.