


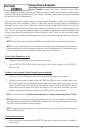

2. Press the VIEW key until you see the Snapshot and Recording View.
3. You can scroll through the whole list of captures in this view using the 4-WAY Cursor keys.
Highlight a thumbnail (using the Up or Down 4-Way Cursor keys), then use the Right 4-Way
Cursor key to view the full image. A border around the full-size screen capture indicates that it is
just a screen capture, not a “live” view. You can delete the highlighted image, or all captured
images, using the Snapshot and Recording X-Press™ menu. (See Snapshot and Recording
X-Press™ menu: Delete Image and Delete All Images for more information).
NOTE: When you highlight a snapshot thumbnail, the amount of room remaining on the SD card will be
displayed.
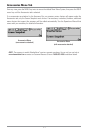
To view a screen snapshot using snapshot waypoints:
1. Make sure that the optional-purchase MMC/SD card used to capture the snapshot waypoints is
installed in your card slot.
2. Press the VIEW key until you see the Chart View.
3. Move the cursor until you are over a snapshot waypoint. A thumbnail will be displayed within a
frame, and a line that points from the center of the cursor icon to the center of the thumbnail.
Press the INFO key to view that screen snapshot.
4. Pressing the EXIT key will show the cursor on the waypoint, with the snapshot thumbnail
displayed again.
NOTE: The waypoints that are created by a snapshot have the same name as the file and use a custom waypoint
icon. Screen Snapshot filenames begin with the letter "S".
NOTE: You may view data files associated with each screen snapshot by removing the MMC/SD card from your
unit and installing it in your optional-purchase MMC/SD card reader connected to a PC. Use Windows Explorer
to see the contents of your MMC/SD card; you will notice that a .DAT (may show up as .TXT) file is created for
every .BMP screen capture; this data file includes the thumbnail view, and is required in order to be able to view
the screen snapshot from your unit, so don’t delete these files.
173