


Flush Mount Temp/Speed Gauge
1
530501-1_B
Thank You
Thank you for choosing Humminbird®, America's #1 name in fishfinders. Humminbird® has built its reputation by designing
and manufacturing top-quality, thoroughly reliable marine equipment. Genuine Humminbird® accessories offer the
opportunity to upgrade and expand the capabilities of your Humminbird® product.
Your Humminbird® is designed for trouble-free use in even the harshest marine environment. In the unlikely event that your
Humminbird® does require repairs, we offer an exclusive Service Policy - free of charge during the first year after purchase, and
available at a reasonable rate after the one-year period. For complete details, see the Warranty section included in this manual.
Contact our Customer Resource Center at either 1-800-633-1468 or visit our website at www.humminbird.com.
Installation Overview
Following are instructions for the installation of this accessory. Before you start installation, we encourage you to read these
instructions carefully in order to get the full benefit from your Humminbird® accessory.
If you find that any items are missing from your installation kit, call our Customer Resource Center at 1-800-633-1468 or
visit our website at www.humminbird.com.
NOTE: This accessory requires drilling a hole in the hull of the boat; therefore, installation should be performed by a qualified
marine technician.
In addition to the hardware supplied with your accessory, you will need a drill, a small drill bit for a pilot hole, a 2" hole saw,
a level, and marine-grade silicone sealant.
Installation
Perform the procedures in the following sections to install the Temp/Speed Gauge on your boat.
1. Testing the Temp/Speed Gauge Prior to Installation
Prior to installation, test the Temp/Speed Gauge to make sure that no damage occurred during shipping.
1. After connecting the temp/speed gauge to the control head, hold the gauge in the water over the side of the boat to
confirm proper operation. If the gauge is working properly, the control head will begin displaying water temperature
immediately.
2. Locating the Temp/Speed Gauge Mounting Position
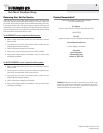
You must first determine the best location on the transom to install the Temp/Speed Gauge. It is very important to locate the
gauge in an area that is relatively free of turbulent water, constantly submerged, and positioned to allow you to trailer the
boat without damaging the gauge.
The best location will be aft midship, as close to the centerline of the boat as possible. The gauge should be mounted
forward of the prop(s) on inboard boats, and separate from other transducers, strakes, rivets, ribs, or other protrusions.
Inside the boat, there must be room to access the mounting location for installation and cable routing. Notice that the
Temp/Speed Gauge is removable from the threaded housing - adequate overhead space must be available to remove
this insert.
3. Attaching the Temp/Speed Gauge
1. From the outside of the hull, drill a small pilot hole (smaller than the centering bit of your drill bit or hole saw), at the
mounting location you selected in procedure 2.
2. Use the pilot hole (from the outside of the hull) to drill a 2" hole.
3. Thoroughly clean and deburr the drilled hole and clean the outside of the hull.
4. Disassemble the temp/speed gauge and wing nut from the threaded housing.
© 2008 Humminbird®, Eufaula AL, USA.
All rights reserved.
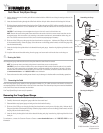
Thru-Hull Installation
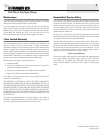
Areas of Possible Turbulence
Rivets Transom
Strakes Hull
Stepped Hull
Rib
Step