


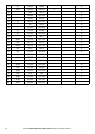


57Northstar Explorer VHF Series: 721US, 721EU Operation and Installation Manual
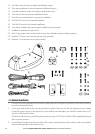
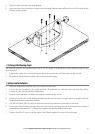
4. Slide the radio into the mounting gimbal.
5. Insert the two mounting knobs through the holes and tighten them suffi ciently to hold the radio at the
desired viewing angle.
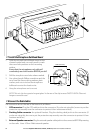
7-5 Change the Viewing Angle
The viewing angle on the gimbal mount has a 20º tilt range. To change the current viewing angle on the
gimbal mount:
1. Support the radio, then cautiously loosen the mounting knobs until the radio can be moved.
2. Re-position the radio then tighten the mounting knobs again.
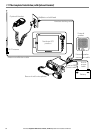
7-6 Recessed Installation
1. Tape the installation template onto the chosen location site.
2. Cut out the area marked by the solid dark line. (The dashed line indicates the total area that will be
covered by the radio fascia after installation.)
3. Remove the installation template and slide the radio into the cavity.
4. Working from the rear of the bulkhead, align the racheted outstand on each side of the radio with the
central hole in each mounting bracket.
5. Use the two short M5x10 screws to screw the mounting brackets to the sides of the radio.
6. Screw each M5x32 screw through the screw hole in the mounting bracket, then attach the stopper. If
your bulkhead exceeds 0.51” (13mm), the stopper can be discarded if necessary.
7. Tighten the M5x32 screws until the radio is held fi rmly against the rear of the bulkhead.