


JM898WFA
FIG. 1
FIG. 2
Jumbo RF Weather Clock with Indoor
Thermometer
Model: JM898WFA
USER MANUAL
OVERVIEW
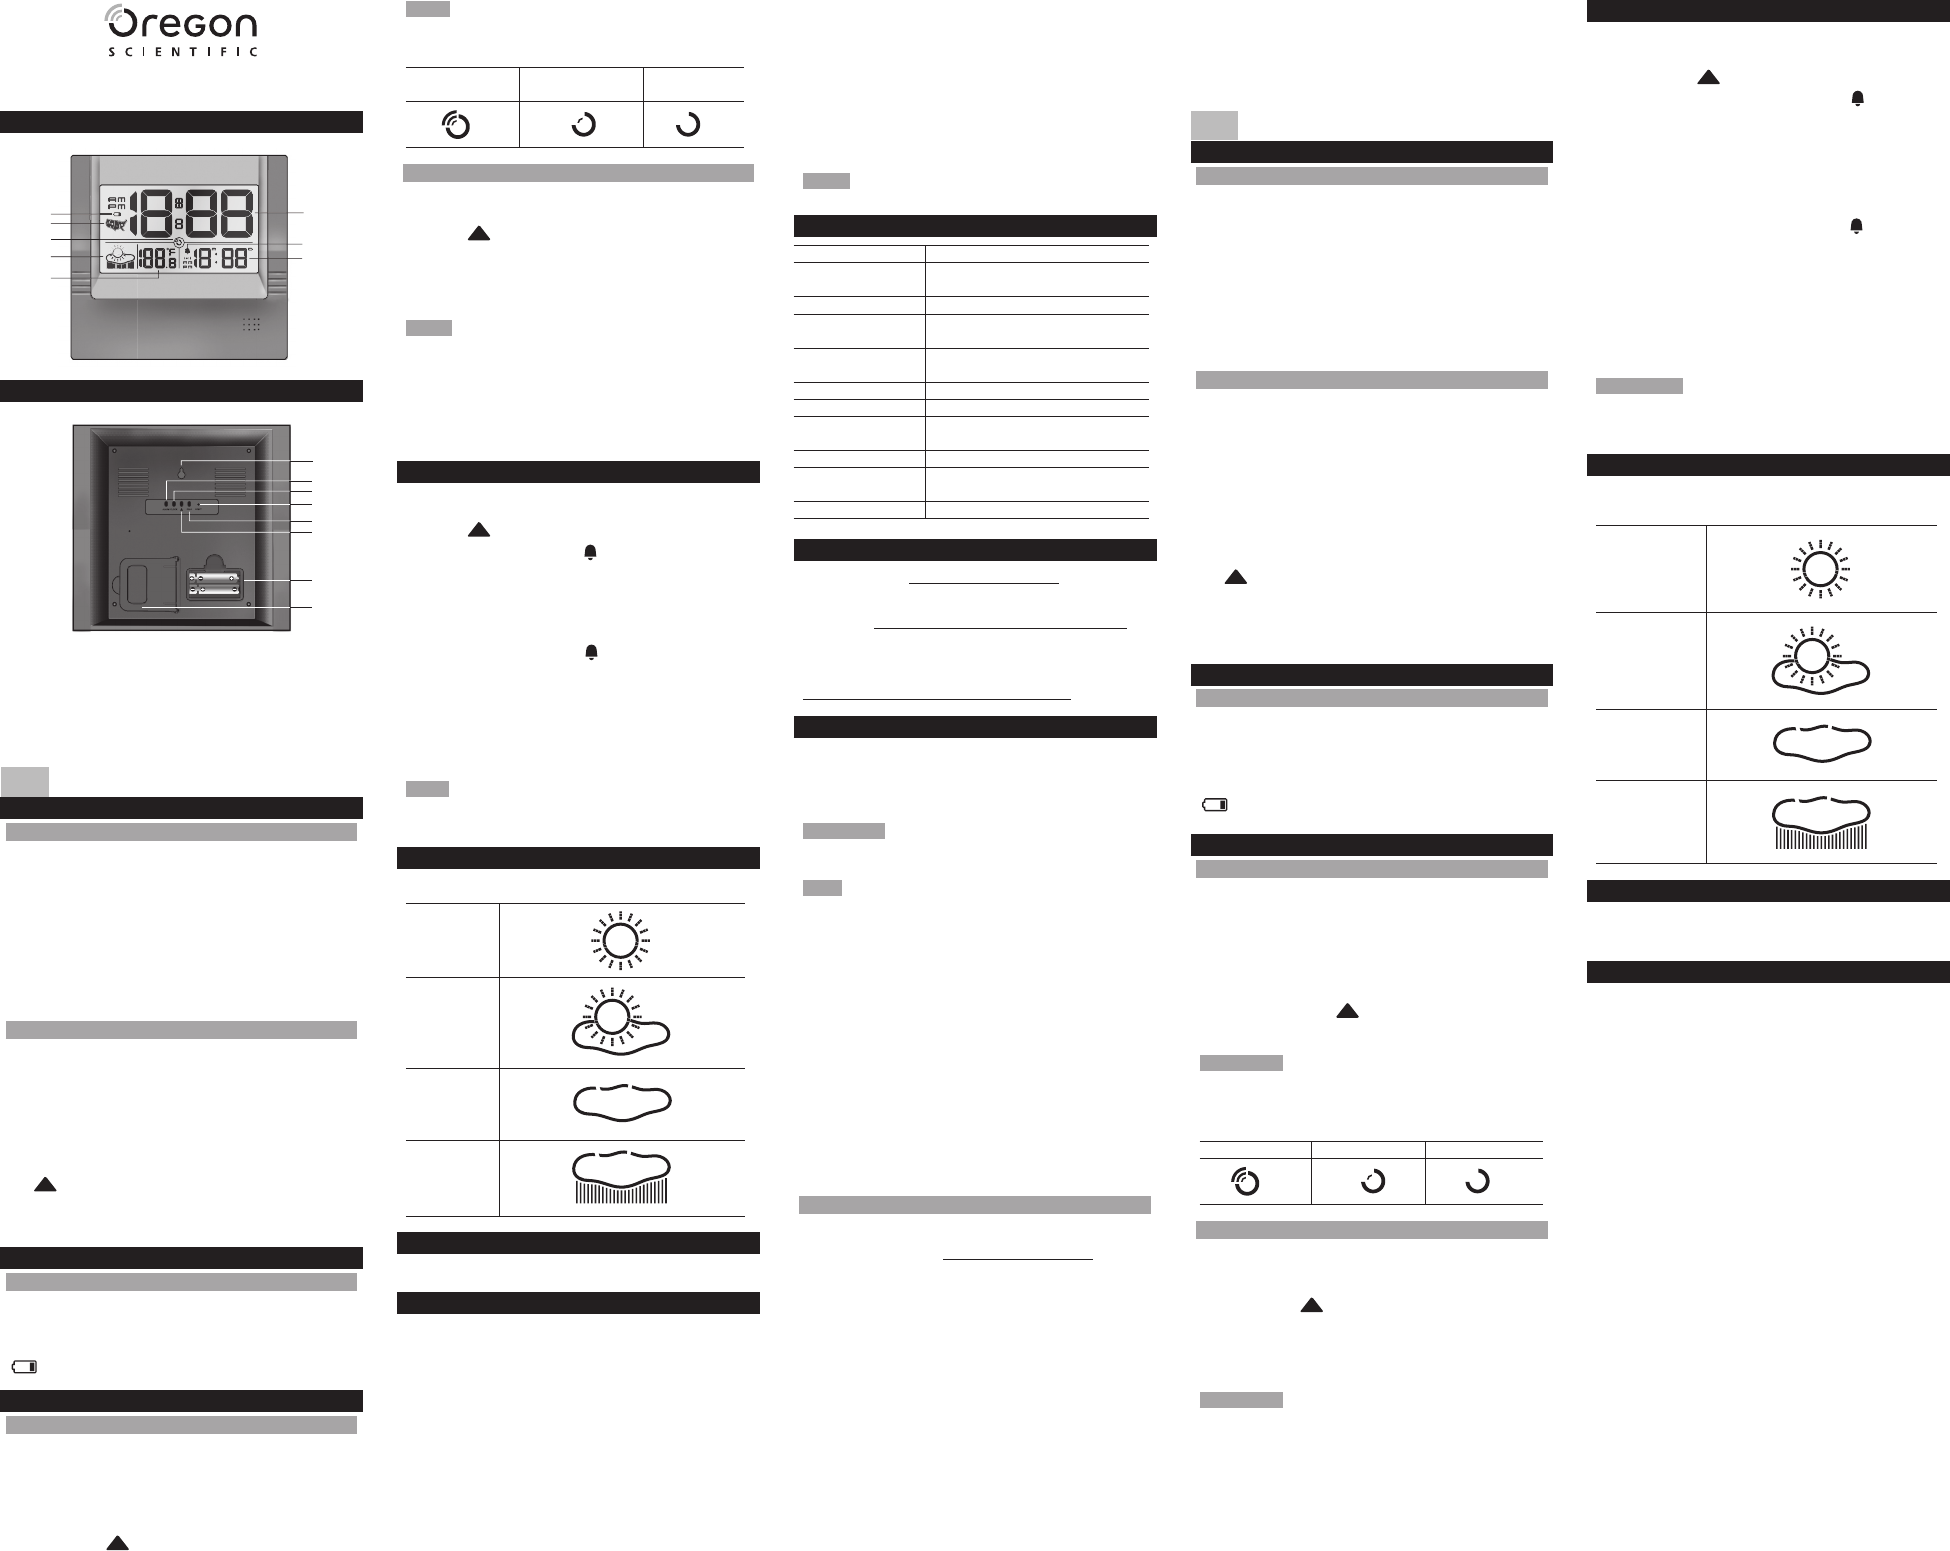
LCD DISPLAY (FIG 1)
1. Clock
2. Alarm indicator
3. Alarm time / Calendar
4. Battery low indicator
5. Time zone
6. Clock signal reception indicator
7. Weather forecast indicator
8. Indoor temperature
display
BACK VIEW (FIG 2)
1. Wall mount hole
2. ALARM: Display alarm setting mode; control alarm
function
3. CLOCK: Toggle clock-calendar display; display clock-
calendar setting mode
4. RESET: Reset unit to default settings
5. ZONE : Select time zone; deactivate clock reception signal
6. : Increase setting; activate clock reception signal
7. Battery compartment
8. Table stand
GETTING STARTED
INSERT BATTERIES (SEE FIG 2)
1. Remove the battery compartment and insert the
batteries, matching the polarities.
2. Press
RESET after each battery change.
indicates batteries are low.
CLOCK
CLOCK RECEPTION
This product is designed to synchronize its clock automatically
once it is brought within range of a radio signal.
• WWVB-60 signal: within 3200km (2000 miles) of Fort
Collins Colorado.
To enable / disable signal reception:
Press and hold
to enable or ZONE to disable signal
reception.
1
6
7
8
2
3
4
5
1
2
3
4
5
6
7
8
EN
NOTE Reception takes 2-10 minutes. If the signal is weak,
it can take up to 24 hours to get a valid signal.
Clock signal reception indicator:
STRONG
SIGNAL
WEAK SIGNAL NO SIGNAL
SET CLOCK
To set the clock manually, disable the signal reception first.
1. Press and hold
CLOCK.
2. Press
to change the settings.
3. Press
CLOCK to confirm.
4. The settings order is: hour, minute, year, month, day and
language.
NOTE The language options are English (E), French (F),
and Spanish (S).
To select time zone:
Press ZONE.
To toggle between seconds and weekday display:
Press CLOCK.
ALARM
To set alarm:
1. Press and hold
ALARM.
2. Press
to set hour / minute.
3. Press
ALARM to confirm. indicates alarm is ON.
To display alarm time in Calendar mode:
Press ALARM.
To turn alarm ON / OFF:
Press ALARM in Alarm mode. indicates alarm is ON.
To silence the alarm:
Press ALARM.
To display calendar in Alarm mode:
Press CLOCK.
NOTE If the alarm is left activated for 1 minute, snooze will
be enabled automatically and the alarm will be silenced for 8
minutes. To turn the alarm off, press any other key.
WEATHER FORECAST
This product forecasts the next 12 to 24 hours of weather.
Sunny
Partly
cloudy
Cloudy
Rainy
RESET
Press RESET to return to the default settings.
PRECAUTIONS
• Do not subject the unit to excessive force, shock, dust,
temperature or humidity.
• Do not cover the ventilation holes with any items such as
newspapers, curtains etc.
• Do not immerse the unit in water. If you spill liquid over
it, dry it immediately with a soft, lint-free cloth.
• Do not clean the unit with abrasive or corrosive materials.
• Do not tamper with the unit’s internal components. This
invalidates the warranty.
• Only use fresh batteries. Do not mix new and old batteries.
• Images shown in this manual may differ from the actual
display.
• When disposing of this product, ensure it is collected
separately for special treatment.
• Placement of this product on certain types of wood
may result in damage to its finish for which Oregon
Scientific will not be responsible. Consult the furniture
manufacturer's care instructions for information.
• The contents of this manual may not be reproduced
without the permission of the manufacturer.
• Do not dispose old batteries as unsorted municipal
waste. Collection of such waste separately for special
treatment is necessary.
• Please note that some units are equipped with a
battery safety strip. Remove the strip from the battery
compartment before first use.
NOTE The technical specifications for this product and the
contents of the user manual are subject to change without notice.
SPECIFICATIONS
TYPE DESCRIPTION
L x W x H
224 x 27 x 214 mm
(8.82 x 1.06 x 8.43 in)
Weight 430 g (15.17 oz) (without battery)
Indoor temperature
range
23°F to 122°F
Temperature
resolution
0.2°F
Temperature unit °C / °F
Radio frequency WWVB-60
Clock
• 12 hr format
• HH:MM:SS
Calendar format MM - DD
Alarm
• 1 minute crescendo alarm
• 8 minute snooze function
Power 4 x UM-3 (AA) 1.5 V batteries
ABOUT OREGON SCIENTIFIC
Visit our website (www.oregonscientific.com) to learn more
about Oregon Scientific products. If you’re in the US and
would like to contact our Customer Care department directly,
please visit: www2.oregonscientific.com/service/support
OR
Call 1-800-853-8883.
For international inquiries, please visit:
www2.oregonscientific.com/about/international
FCC STATEMENT
This device complies with Part 15 of the FCC Rules.
Operation is subject to the following two conditions: (1) This
device may not cause harmful interference, and (2) This
device must accept any interference received, including
interference that may cause undesired operation.
WARNING Changes or modifications not expressly
approved by the party responsible for compliance could void
the user’s authority to operate the equipment.
NOTE
This equipment has been tested and found to comply
with the limits for a Class B digital device, pursuant to Part
15 of the FCC Rules. These limits are designed to provide
reasonable protection against harmful interference in a
residential installation.
This equipment generates, uses and can radiate radio
frequency energy and, if not installed and used in accordance
with the instructions, may cause harmful interference to
radio communications. However, there is no guarantee
that interference will not occur in a particular installation. If
this equipment does cause harmful interference to radio or
television reception, which can be determined by turning the
equipment off and on, the user is encouraged to try to correct
the interference by one or more of the following measures:
• Reorient or relocate the receiving antenna.
• Increase the separation between the equipment and receiver.
• Connect the equipment into an outlet on a circuit different
from that to which the receiver is connected.
• Consult the dealer or an experienced radio / TV technician
for help.
DECLARATION OF CONFORMITY
The following information is not to be used as contact for
support or sales. Please call our customer service number
(listed on our website at www.oregonscientific.com or on the
warranty card for this product) for all inquiries instead.
We
Name: Oregon Scientific, Inc.
Address: 19861 SW 95
th
Ave.,Tualatin,
Oregon 97062 USA
Telephone No.: 1-800-853-8883
declare that the product
Product No.: JM898WFA
Product Name: Jumbo RF Weather Clock with
Indoor Thermometer
Manufacturer: IDT Technology Limited
Address: Block C, 9/F, Kaiser Estate,
Phase 1,41 Man Yue St., Hung
Hom, Kowloon, Hong Kong
is in conformity with Part 15 of the FCC Rules. Operation is
subject to the following two conditions: 1) This device may
not cause harmful interference. 2) This device must accept
any interference received, including interference that may
cause undesired operation.
FR
Horloge Station Météo Ecran
Jumbo et Thermomètre Intérieur
Modèle : JM898WFA
MANUEL DE L’UTILISATEUR
VUE D’ENSEMBLE
ECRAN LCD (FIG 1)
1. Horloge
2. Indicateur de l’alarme
3. Heure de l’alarme / Calendrier
4. Indicateur de faiblesse des piles
5. Fuseaux horaires
6. Indicateur de réception du signal du radio pilotage
7. Indicateur de prévision météo
8. Affichage de la température intérieure
FACE ARRIERE ( FIG 2)
1. Trou de fixation murale
2. ALARM: Affiche le mode de réglage de l’alarme ;
commande la fonction alarme
3. CLOCK : Permet d’alterner entre l’affichage du
calendrier, affiche le mode de réglage de l’horloge-
calendrier
4. RESET (REINITIALISER) : Réinitialise l’appareil aux
réglages par défaut
5. ZONE : Sélectionnez le fuseau horaire, désactive le
signal de réception de l’horloge
6. : Augmente le réglage, active le signal de réception
de l’horloge
7. Compartiment des piles
8. Support de table
POUR COMMENCER
INSERTION DES PILES (VOIR FIG 2)
1. Ouvrez le compartiment des piles et insérez les piles en
respectant les polarités (+/-).
2. Appuyez sur RESET (REINITIALISER) après chaque
changement de piles.
indique que les piles sont faibles.
HORLOGE
RÉCEPTION DE L’HORLOGE
Ce produit est conçu de manière à synchroniser
automatiquement l’horloge une fois positionnée dans le
champ de transmission d’un signal radio.
• Signal WWVB-60 : dans un rayon de 3200 km (2000
miles) de Fort Collins, Colorado.
Activer / désactiver la réception du signal :
Maintenez le bouton
pour activer ou ZONE pour
désactiver le signal de réception.
REMARQUE
La Réception prend entre 2 et 10 minutes. Si
le signal est faible, 24 heures peuvent être nécessaires pour
obtenir un signal valide.
Indicateur de réception du signal de l’Horloge :
SIGNAL FORT SIGNAL FAIBLE AUCUN SIGNAL
RÉGLER L’HORLOGE
Pour régler manuellement l’horloge, vous devez, tout
d’abord, désactiver la réception du signal.
1. Appuyez et maintenez la touche
CLOCK.
2. Appuyez sur
pour modifier les réglages.
3. Appuyez sur
CLOCK pour confirmer.
4. Les réglages s’effectuent dans l’ordre suivant : heure,
minute, année, mois, jour et langue.
REMARQUE
Les langues disponibles sont l’anglais (E), le
français (F), et l’espagnol (S).
Pour sélectionnez le fuseau horaire:
Appuyez sur ZONE.
Pour alterner entre l’affichage des jours de la semaine
et des secondes :
Appuyez CLOCK.
ALARME
Pour régler l’alarme :
1. Appuyez et maintenez la touche
ALARM.
2. Appuyez sur
pour régler l’heure / les minutes.
3. Appuyez sur
ALARM pour confirmer. indique que
l’alarme est activée.
Afficher l’heure de l’alarme et le mode Calendrier :
Appuyez sur ALARM.
Pour activer / désactiver l’alarme :
Appuyez sur ALARM en mode Alarme
. indique que
l’alarme est activée.
Pour couper le son de l’alarme :
Appuyez sur ALARM.
Afficher le calendrier en mode Alarme :
Appuyez sur CLOCK.
REMARQUE Si vous laissez l’alarme pendant 1 minute,
le rappel d’alarme (snooze) sera automatiquement activé et
l’alarme s’éteindra pour 8 minutes. Pour éteindre l’alarme,
appuyez sur n’importe quelle autre touche.
PRÉVISIONS MÉTÉOROLOGIQUES
Ce produit vous fournit les prévisions météo pour les
prochaines 12 à 24 heures.
Ensoleillé
Partiellement
nuageux
Nuageux
Pluvieux
REINITIALISATION
Appuyez sur RESET pour que l’appareil revienne aux
réglages par défaut.
PRECAUTIONS
• Ne pas soumettre le produit à une force excessive, au
choc, à la poussière, aux changements de température
ou à l’humidité.
• Ne pas couvrir les trous de ventilation avec des journaux,
rideaux etc…
• Ne pas immerger le produit dans l’eau. Si vous renversez
du liquide sur l’appareil, séchez-le immédiatement avec
un tissu doux.
• Ne pas nettoyer l’appareil avec des matériaux corrosifs
ou abrasifs.
• Ne pas trafiquer les composants internes. Cela invalidera
votre garantie.
• N’utilisez que des piles neuves. Ne pas mélanger des
piles neuves et usagées.
• Les images de ce manuel peuvent différer de l’aspect
réel du produit.
• Lorsque vous désirez vous débarrasser de ce produit,
assurez-vous qu’il soit collecté séparément pour un
traitement adapté.
• Le poser sur certaines surfaces en bois peut
endommager la finition du meuble, et Oregon Scientific
ne peut en être tenu responsable. Consultez les mises
en garde du fabricant du meuble pour de plus amples
informations.
• Le contenu du présent manuel ne peut être reproduit
sans la permission du fabriquant.
• Ne pas jeter les piles usagées dans les containers
municipaux non adaptés Veuillez effectuer le tri de ces
ordures pour un traitement adapté si nécessaire.
• Veuillez remarquer que certains appareils sont
équipés d’une bande de sécurité. Retirez la bande du
compartiment des piles avant la première utilisation.