


5. Press the OK button.
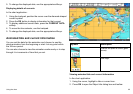
Radar overlay
You can combine the chart with the radar or MARPA functions to
provide target tracking or to help you distinguish between xed
objects and other marine trafc.
You can enhance the use of your chart by combining it with the
following radar features:
• Radar range synchronization.
• MARPA.
• Radar overlay (for distinguishing between xed and moving
objects).
Radar range synchronization
When synchronization is switched on:
• The radar range in all radar windows, changes to match the chart
scale.
• ‘Sync’ is indicated in the top left-hand corner of the chart window.
• If you change the radar range, in any radar window, all
synchronized chart views change scale to match.
• If you change the scale of a synchronized chart window, all radar
windows change range to match.
Using the radar to view MARPA targets on the chart
The Mini Automatic Radar Plotting Aid (MARPA) function is used
for target tracking and risk analysis. When MARPA is set up in
radar mode or radar overlay, all MARPA targets are displayed in the
chart window and associated MARPA functions can be accessed
via the chart.
Using radar overlay to distinguish between xed and moving
objects
You can overlay radar image data over your chart image allowing
better distinction between xed objects and other marine trafc. For
best results, switch on Radar-Chart synchronization to ensure radar
range and chart scale are synchronized.
Enabling and disabling radar overlay
In the chart application:
1. Press the PRESENTATION softkey.
2. Press the CHART LAYERS softkey.
3. Press the RADAR OVERLAY softkey until the ON or OFF option
is selected, as required.
Note: If radar overlay is applied to a chart window that is set
to system view, the overlay will be displayed in all other system
view chart windows.
Changing the radar range from the chart display
In the chart application:
1. Press the PRESENTATION softkey.
2. Press the CHART MODE AND ORIENTATION softkey.
3. Press the CHART SYNC softkey until the RDR option is selected.
4. Press the OK button.
5. Use the RANGE IN or OUT control to change the radar range.
Synchronizing the chart with the radar range
In the chart application:
1. Press the PRESENTATION softkey.
2. Press the CHART MODE AND ORIENTATION softkey.
3. Press the CHART SYNC softkey until the RDR option is selected.
Using the chart
65