


6.11 Waypoints
Waypoint navigation
Navigating to a waypoint using the cursor
In the chart application:
1. Position the cursor over the waypoint you want to navigate to.
2. Press the GO TO WAYPOINT softkey.
Navigating to a waypoint using the GOTO option
In the chart application:
1. Press the GOTO softkey.
2. Press the GOTO WAYPOINT OPTIONS or GOTO CURSOR
softkey, as appropriate.
3. Select the required waypoint from the list.
4. Press the GOTO WAYPOINT softkey.
Navigating to an existing waypoint selected on screen
In the chart application:
1. Position the cursor over the required waypoint.
2. Press the GOTO WAYPOINT softkey.
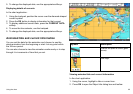
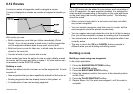
The chart displays a dashed line from your vessel to the active
waypoint, and navigation commences.
Note: When you arrive at your target waypoint, a message
will appear, and an alarm will sound. To acknowledge the
message and silence the alarm, wait 10 seconds or press
ACKNOWLEDGE.
To stop navigating to a waypoint
1. Press the WPTS/MOB button.
2. Press the GOTO WAYPOINT OPTIONS softkey.
3. Press the STOP GOTO softkey.
4. Alternatively, position the cursor over the active waypoint, and
press the STOP GOTO softkey.
Note: Once navigation is no longer active, the waypoint symbol
returns to its normal unboxed state, and the dashed line between
your boat and the waypoint is removed.
Waypoint editing
Moving a waypoint by entering new coordinates
In the chart application:
1. Using the trackpad, move the cursor to the relevant waypoint.
Alternatively, select a waypoint from the Waypoint List.
2. Press the VIEW AND EDIT DETAILS softkey.
3. Using the rotary control, highlight the information you want to
change.
4. Press the relevant EDIT softkey.
5. Using the rotary control and trackpad, edit the information in the
Position, BRG, and RNG elds as appropriate.
6. Press the OK button once to apply the changes and twice to
exit the Edit Waypoint dialog.
Note: To abandon a move waypoint operation, press CANCEL.
Erasing a waypoint using the cursor
In the chart application:
Using the chart
73