SAMSUNG LASER PRINTER
Setup Guide
ML-1510
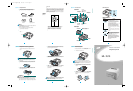
Step 1: Unpacking
1
Remove the Printer and all accessories from the packing
carton. Make sure that the printer has been packed with the
following items:
Notes:
• If any items are missing or damaged, notify your dealer
immediately.
•Components may differ from one country to another.
• The CD-ROM contains the printer driver, the User’s Guide, and
the Adobe Acrobat Reader program.
2
Carefully remove all of packing tapes from the printer.
Toner Cartridge
Power Cord
CD-ROM
Setup Guide
Tape
Selecting a Location
Select a level, stable place with adequate space for air
circulation. Allow extra space for opening covers and tray. The
area should be well-ventilated and away from direct sunlight or
sources of heat, cold, and humidity. See the image below for
clearance space. Do not place the printer close to the edge of
your desk or table!
Clearance
Space
•
Front
: 482.6 mm (enough space so that tray can be
removed)
•
Back
: 100 mm (enough space to allow opening of the rear
out tray)
•
Right
: 100 mm (enough space for ventilation)
•
Left
: 100 mm
552 mm(21.7 in.)
100 mm
(3.9 in.)
954.6 mm(37.5 in.)
482.6 mm(18.8 in.)
100 mm
(3.9 in.)
100 mm
(3.9 in.)
Step 2: Understanding Your Printer
Front View
Rear View
Manual Feeder guide Tray
Top output tray
(Face down)
Control Panel
Power switch
Manual Feeder
Output Support
Paper level indicator
Toner
cartridge
Front Cover
Power receptacle
USB port
Rear output tray
(Face up)
Understanding the Control Panel
Button and LEDs
Button or LED Description
• If the
On Line/Error
LED lights green, the
printer is ready to print.
• If the
On Line/Error
LED lights red, the
printer is experiencing an error, such as
jammed paper, the open cover or the empty
toner cartridge. For detailed information, refer
to the User’s Guide of the printer.
• In Manual Feed mode, if there is no paper in the
Manual Feeder this LED blinks red.
• If you press the
Cancel
button while the
printer is receiving data, this LED blinks red to
cancel printing.
• If the printer is receiving data or printing the
received data, this LED blinks green.
• If this LED is on, the Toner Save mode is
enabled. If this LED is off, the mode is disabled.
• In Ready mode, press and hold this button for
about 2 seconds to print a demo page or for
about 10 seconds to print a cleaning sheet.
• In Ready mode, press this button to turn the
Toner Save mode on or off. For detailed
information, refer to the User’s Guide of the
printer.
• Press this button each time you load a sheet of
paper in the manual feeder. For detailed
information about manual feeding, refer to the
User’s Guide of the printer.
• During printing, press this button to cancel the
print job.
Step 3: Installing the Toner Cartridge
1
Grasp the front cover and pull it toward you to open.
Note:
Because the printer is very light, it may be moved when you
use it; for example, when opening/closing the tray or installing/
removing the toner cartridge. Be careful not to move the printer.
2
Remove the toner cartridge from its bag and remove the
paper covering the cartridge.
3
Gently shake the cartridge from side to side to distribute
the toner evenly inside the cartridge.
CAUTION:
• To prevent damage, do not expose the toner cartridge to light for
more than a few minutes. Cover it with a piece of paper, if left
exposed for more than a few minutes.
• If toner gets on your clothing, wipe it off with a dry cloth and
wash clothing in cold water. Hot water sets toner into fabric.
4
Locate the cartridge slots inside the printer, one on each
side.
5
Grasp the handle and insert the cartridge in the printer until
it snaps into place.
6
Close the front cover. Make sure that the cover is securely
closed. If the cover is not firmly closed, printing errors may
occur when you print.
Note:
When printing text at 5% coverage, you can expect a toner
cartridge life of approximately 3,000 pages (1,000 pages for the
toner cartridge that is shipped with the printer).
Step 4: Loading Paper
You can load approximately 250 sheets of paper in the tray.
1
Pull the tray out of the printer.
Note:
Because the printer is very light, it may be moved when you
use it; for example, when opening/closing the tray or installing/
removing the toner cartridge. Be careful not to move the printer.
2
Push down the pressure plate until it locks in position.
3
Prepare a stack of paper for loading by flexing or fanning
them back and forth. Straighten the edges on a level
surface.
SAMSUNG LASERPRINTER
Paigaldusjuhend
Samm 1: Lahtipakkimine
Laserprinteri kassett
CD-ROM
Toitejuhe
Paigaldusjuhend
Võtke printer ja selle tarvikud kartongpakendist välja.
Veenduge, et printeriga on kaasas järgnevad tarvikud:
2.Eemaldage printerilt ettevaatlikult kõik pakkimiseks kasutatud .
Märkused:
• Kui mõni tarvik puudub või on vigastatud, teavitage sellest kohe
seadme müüjat.
• Tarvikud võivad piirkonniti erineda.
• CD-ROM sisaldab printeri draiverit, kasutusjuhendit ja
programmi Adobe Acrobat Reader.
Koha valik
Valige printeri jaoks stabiilne tasane koht, kus õhk piisavalt ringleks.
Varuge lisaruumi avatavate kaante ja sahtlite jaoks. Printeri piirkond
peab olema hästi ventileeritud ja eemal otsesest päikesevalgusest
või soojus-, külma- ja niiskusallikatest. Vaadake allpool olevat pilti,
millel on kujutatud printeri jaoks mõeldud piirkond. Ärge paigutage
printerit liiga laua serva lähedale!
Printeri
piirkond
• Ees: 482,6 mm (piisavalt ruumi sahtli väljavõtmiseks)
• Taga: 100 mm (piisavalt ruumi küljesahtli avamiseks)
• Paremal: 100 mm (piisavalt ruumi ventileerimiseks)
• Vasakul: 100 mm (piisavalt ruumi ventileerimiseks)
Samm 2: Printeri osad
Vaade eest
Vaade tagant
Paberitugi
Ülemine
väljastussahtel
(trükitud pool
alla)
Juhtimispaneel
Toitelüliti
Sahtel
Paberi taseme
näitaja
Käsitsi söötmise
suunaja
Ava käsitsi
söötmiseks
Esikaas
Tagumine väljastussahtel
(trükitud pool üles)
Laserprinteri
kassett
USB port
Toitejuhtme pesa
Juhtimispaneel
Nupud ja hoiatuslambid
Nupp või
hoiatuslamp
Kirjeldus
• Kui hoiatuslamp On Line/Error on roheline, on
printer printimiseks valmis.
• Kui hoiatuslamp On Line/Error on punane, on
printer tuvastanud vea, näiteks paberiummistuse,
avatud sahtli või tühja kasseti. Lähemat informat
siooni leiate printeri kasutusjuhendist
• Käsitsi söötmise režiimis on hoiatuslamp punane, kui
käsitsi söötmise sahtlis ei ole paberit.
• Juhul, kui andmete vastuvõtmise ajal vajutatakse
nuppu Cancel, hakkab hoiatuslamp punasena
vilkuma, andes märku trükkimise katkestamisest.
• Ajal, mil printer võtab andmeid vastu või trükib
vastuvõetud andmeid välja, vilgub sama hoiatuslamp
rohelisena.
• Kui see hoiatuslamp põleb, on kasseti säästurežiim
sisselülitatud. Kui hoiatuslamp ei põle, on see režiim
tühistatud.
• Selleks, et režiimis Ready printida välja demoleht,
vajutage nupule ja hoidke nuppu all umbes 2 sekundit.
Puhastuslehe väljatrükkimiseks hoidke nuppu all
umbes 10 sekundit.
• Kasseti säästmisfunktsiooni sisse- või
väljalülitamiseks vajutage seda nuppu režiimis Ready.
Lähemat teavet saate printeri kasutusjuhendist.
• Vajutage nuppu iga kord, kui asetate paberit käsitsi
söötmise sahtlisse. Lähemat teavet käsitsi söötmise
kohta leiate printeri kasutusjuhendist.
• Printimise ajal vajutage nuppu printimise
katkestamiseks.
Samm 3: Laserprinteri kasseti paigaldamine
Võtke kinni esikaanest ja tõmmake seda avamiseks enda
Märkus: Printer on väga kerge, sellepärast võidakse teda
kasutamise ajal (näiteks sahtlite avamisel/sulgemisel või kasseti
paigaldamisel/eemaldamisel) liigutada. Olge ettevaatlik ja ärge
printerit liigutage.
Võtke kassett pakendist välja ja eemaldage sellelt paberkate.
Raputage kassetti õrnalt küljelt küljele, et kasseti sees olev
värvaine jaguneks ühtlaselt.
ETTEVAATUST:
• Selleks, et vältida kahjustusi, ärge jätke värvikassetti valguse kätte
kauemaks kui mõneks minutiks. Kui kassett on jäänud valguse kätte
pikemaks ajaks, katke see paberiga kinni.
• Kui värvaine satub Teie riietele, pühkige see kuiva riidega maha ja
peske riideid külmas vees. Soe vesi aitab värvainel kangasse imbuda.
Otsige printeri seest kasseti paigaldamiseks mõeldud avaused
üles. Kummalgi poolel on üks suunaja.
Võtke käepidemest kinni ja paigutage kassett printerisse, kuni
see lukustub oma kohale.
Sulgege esikaas. Veenduge, et kaas oleks kindlalt suletud. Kui
kaas ei ole tihedalt suletud, võib printimise tulemus olla
ebakvaliteetne.
Märkus: Kui prindite paberit, mis on kaetud tekstiga 5%, saab ühe
kassetiga printida välja umbes 3000 lehte teksti (1000 lehte
printeriga kaasas oleva kassetiga).
Samm 4: Paberi sissepanek
Te võite paigutada sahtlisse umbes 250 lehte paberit.
Tõmmake sahtel printerist välja.
Märkus: Printer on väga kerge, sellepärast võidakse teda
kasutamise ajal (näiteks sahtlite avamisel/sulgemisel või kasseti
paigaldamisel/eemaldamisel) liigutada. Olge ettevaatlik ja ärge
printerit liigutage.
Vajutage sahtli põhjas olev plaat alla, kuni see lukustub oma
kohale.
Valmistage printerisse panekuks ette paber, koolutades seda
kergelt ette- ja tahapoole. Tehke nurgad tasasel pinnal
siledaks.
teibid
Teip
poole.
1 2 3
5 6 7
4
1510 uz A3igaunu.qxd 28/1/04 11:24 Page 1