


Version 1.0 ©Copyright 2010, Ambient LLC. All Rights Reserved. Page 3
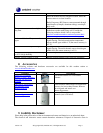
Figure 1
2.4 Display Console Set Up
Note: To avoid permanent damage, please take note of the battery polarity before inserting the
batteries.
Move the remote thermo-hygrometer at least 10’ away from the display console (if the sensor is too
close, it may not be received by the display console).
Remove the battery door on the back of the display. Insert two AA (alkaline or lithium, avoid
rechargeable) batteries in the back of the display console.
All of the LCD segments will light up for a few seconds to verify all segments are operating properly.
Replace the battery door, and fold out the desk stand and place the console in the upright position.
The console will instantly display indoor temperature, date and time. The outdoor temperature and
humidity will display --, then update on the display within a few minutes. Do not touch any buttons
until the remote sensor reports in, otherwise the remote sensor search mode will be terminated, and
you must power down and power up the console again. When the remote sensor data has been
received, the console will automatically switch to the normal mode, and all further settings can be
performed.
If the remote does not update, please reference the troubleshooting guide in Section 7.
2.5 Sensor Operation Verification
Verify the indoor and outdoor temperature match closely with the console and sensor array in the same
location (about 10’ apart). The sensors should be within 4°F (the accuracy is ± 2°F). Allow about 30
minutes for both sensors to stabilize.
3. Remote Sensor Installation
It is recommended you mount the remote sensor on a north facing wall, in a shaded area. Direct
sunlight and radiant heat sources will result in inaccurate temperature readings. Although the sensor is
water resistant, it is best to mount in a well protected area, such as an eve.