


4
DC Connection Precautions
1. Connect and disconnect DC output clamps only after removing AC cord from electric outlet.
2. Never allow clamps to touch each other.
3. Attach clamps to battery and chassis as indicated in “Battery Installed in Vehicle” steps 5 and 6, and in
“Battery Outside of Vehicle” steps 2, 4 and 5.
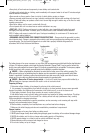
Follow these steps when the battery is installed in a vehicle. A spark near the battery may cause an explosion.
CAUTION: TO REDUCE RISK OF A SPARK NEAR THE BATTERY:
1. Position AC and DC cords away from hood, door, or moving engine parts.
2. Stay clear of fan blades, belts, pulleys, and other parts that can cause injury to persons.
3. Check polarity of battery posts. POSITIVE (POS, P, +) battery post usually has larger diameter than NEGATIVE
(NEG, N, –) post.
4. Determine which post of battery is grounded (connected) to the chassis. If negative post is grounded to
chassis (as in most vehicles), see 5. If positive post is grounded to the chassis, see 6.
5. For negative-grounded vehicle, connect POSITIVE (RED) clamp from battery charger to POSITIVE (POS, P,
+) ungrounded post of battery. Connect NEGATIVE (BLACK) clamp to vehicle chassis or engine block away from
battery. Do not connect clip to carburetor, fuel lines, or sheet-metal body parts. Connect to heavy gauge metal
part of the frame or engine block.
6. For positive-grounded vehicle, connect NEGATIVE (BLACK) clamp from battery charger to NEGATIVE (NEG, N,
–) ungrounded post of battery. Connect POSITIVE (RED) clamp to vehicle chassis or engine block away from
battery. Do not connect clip to carburetor, fuel lines or sheet-metal body parts. Connect to a heavy gauge metal part
of the frame or engine block.
7. When disconnecting charger, disconnect AC cord, remove clamp from vehicle chassis, and then remove
clamp from battery terminal.
8. Do not charge the battery while the engine is operating.
9. See operating instructions for length of charge information.
Follow these steps when the battery has been removed from a vehicle. A spark near the battery may cause an explosion.
CAUTION: TO REDUCE RISK OF A SPARK NEAR THE BATTERY:
1. Check polarity of battery posts. Positive post (marked POS,P, +) usually has a larger diameter than the
Negative battery post (marked NEG, N, –).
2. Attach a 24-inch (minimum length) 6 AWG insulated battery cable to the Negative battery post (marked NEG, N, –).
3. Connect the Positive (RED) battery clamp to the Positive battery post (marked POS, P, + or red).
4. Stand as far back from the battery as possible, and do not face battery when making final connection.
5. Carefully connect the NEGATIVE (BLACK) charger clamp to the free end of the battery cable connected to the
negative terminal.
6. Set the charge rate to appropriate setting according to battery size.
7. When disconnecting charger, always do so in reverse sequence of connecting procedure and break first
connection while as far away from battery as practical.
Note: A marine (boat) battery must be removed and charged on shore. To charge it on board requires
equipment specially designed for marine use. This unit is NOT designed for such use.
• Check unit periodically for wear and tear. Take to a qualified technician for replacement of worn or defective
parts immediately.
• Read And Understand This Instruction Manual Before Using This Unit.
SAVE THESE INSTRUCTIONS
THIS MANUAL CONTAINS IMPORTANT SAFETY AND OPERATING INSTRUCTIONS FOR THE 25 AMP SMART
™
BATTERY
CHARGER MODEL BC25EB.
WARNING: TO REDUCE THE RISK OF INJURY:
• Follow these instructions and those published by the battery manufacturer and manufacturer of any equipment you
intend to use with this unit. Review cautionary markings on these products and on engine.
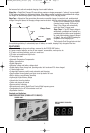
INTRODUCTION
Thank you for selecting the
Black & Decker
®
25 Amp Smart
™
Battery Charger.
With proper care and use, it will
give you years of dependable service. This battery charger has a high charge rate of up to 25 amps, and low charge
rate of 2 amps and 75 amps fo engine starting power.
Smart
™
Battery Chargers feature 3-stage, high-efficiency charging technology, built-in microprocessor control
BC25EB_ManualEN_121007.qxp 12/10/2007 8:42 AM Page 4