


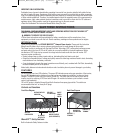
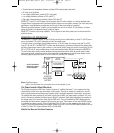


13. Connect the stripped, soldered (longer) end of the positive (+) cable to the red stud marked (+) on the
inverter and tighten the retaining nut.
14. Connect the stripped, soldered end of the negative (–) cable to the black stud marked (–) on the inverter and
tighten the retaining nut.
15. Connect the other (long) end of the (+) positive cable to one terminal of the heavy-duty fuse holder.
16. Connect the other conductor of the heavy-duty fuse holder to the (short) positive (+) battery terminal.
17. Connect the other end of the (–) negative cablewith the ring terminal to the negative (–) battery terminal.
18. Connect an insulated wire (at least #12 AWG) between the chassis grounding screw on the inverter’s case
and a solid electrical ground to minimize possible electrical noise in TVs and radios.
Do not connect this
wire to the negative DC input terminal.
19. Ensure that all electrical connections have been tightened.
20. Ensure that the inverter’s on/ofF Switch is in the off position.
21. Insert the fuse into the fuse holder. There may be some sparking.
22. Ensure the 12 volt DC power source has an adequate charge.
23. Turn the inverter ON and apply a test load to the 120 volt AC outlets.
* Ring terminals are not included and must be supplied by user.
If, after following all of the above steps, the inverter does not perform properly, the source voltage may be too
low or the cables may be too long (or the gauge too light). Having checked and, if necessary, corrected these
conditions, refer to the “Service Information” section of this Instruction Manual for assistance if problems
persist.
Connection To Load
The Power Inverter is equipped with standard North American three-prong type outlets. Plug the cord from the
equipment you wish to operate into the AC outlet(s). Make sure the combined load requirement of your
equipment does not exceed maximum continuous power.
The Power Inverter is engineered to be connected directly to standard electrical and electronic equipment in the
manner described above. Do not connect the Power Inverter to household or RV AC distribution wiring. Do not
connect the Power Inverter to any AC load circuit in which the neutral conductor is connected to ground (earth)
or to the negative of the DC (battery) source.
WARNING
Do not connect to AC distribution wiring!
Operating Tips
For best operating results, the inverter should be placed on a stable, flat surface. The inverter should only be
used in locations that meet the following criteria:
DRY — Do not allow water or other liquids to come into contact with the inverter.
COOL — Surrounding air temperature should be between –0°C and 40°C — ideally between 15°C and 25°C
(60-80°F). Keep the inverter away from direct sunlight, when possible.
WELL-VENTILATED — Keep the area surrounding the inverter clear to ensure free air circulation around the
unit. Do not place items on or over the inverter during operation. The unit will shut down if the internal
temperature gets too hot.
SAFE — Do not use the inverter near flammable materials or in any locations that may accumulate flammable
fumes or gases. This is an electrical appliance that can briefly spark when electrical connections are made or
broken.
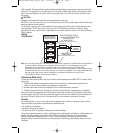
Notes on Using the Remote Control (sold separately)
For ease of use, Vector offers (as a separate item) a Remote Control specifically designed for this line of MAXX
SST inverters. The inverter ON/OFF Switch must be in the OFF position when connecting the Remote Control to
the unit or the Remote Control will not operate. Once the unit has been turned ON using the Remote Control,
inverter operation will continue to be controlled through the Remote Control. Turn the inverter OFF before
disconnecting the Remote Control.
For more information about attaching and using the Remote Control, please refer to the Remote Control User’s
Manual.
11
VEC054D_ManualEN_092107.qxp 9/24/2007 3:40 PM Page 11