19
ENGLISH
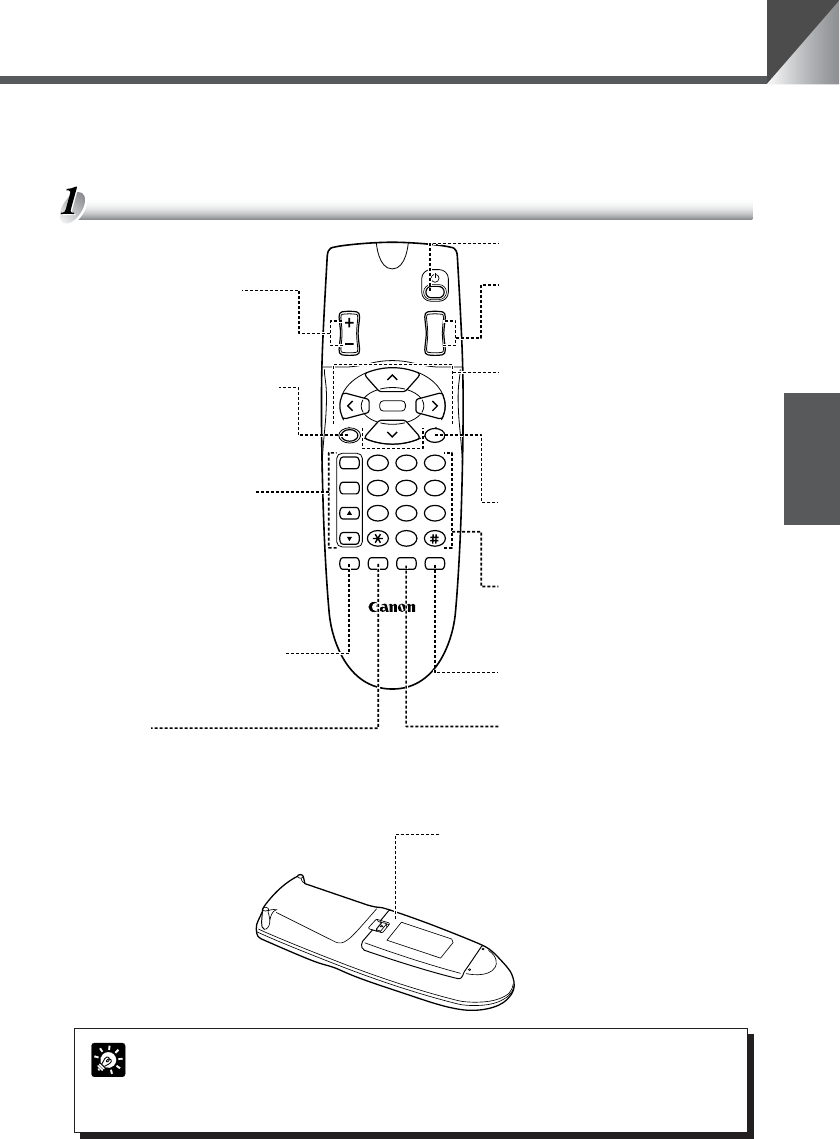
Controlling the Camera from the Wireless Controller
The Wireless Controller WL-V5 is optional.
While the wireless controller buttons are being used, the LED on the camera blinks green (at
0.1-second intervals).
Nomenclature
Whenever possible, switch the camera off when it is not in use (→ P.26) as this
reduces power consumption. If the camera will not be used for an extended
period, unplug the AC adapter from the wall outlet (→ P.18). If you turn the
power off, the date and time will be cleared.
MEMO
321
AF
654
MF
987
0
MENUID
HOME
Fn
BRIGHT
ON SCREEN
∞
SET/OK CANCEL
ZOOM
T
W
WL-V5
WIRELESS CONTROLLER
FOCUS button (→ P.23, 24)
Adjusts the focus.
•AF:Switches to auto-focus.
•MF:Focus is fixed.
• ▲ :Lengthens the focal
distance.
• ▼ :Shortens the focal
distance.
Fn button
Not used.
ZOOM button (→ P.22)
Increases or decreases the size of the
subject on the monitor screen.
• T :Enlarges the subject (zoom in).
• W :Shrinks the subject (zoom out).
BRIGHT button (→ P.24)
Adjusts the brightness of the
image on the monitor.
• + :Brightens the image.
• – :Darkens the image.
SET/OK button (→ P.25, 27, 35)
Used to store preset positions.
Can also be used to proceed to
the next level when specifying
settings in a setting menu.
ON SCREEN button (→ P.27, 29)
Displays or hides the date, time
and text.
Camera ON/OFF button (→ P.26)
Switches the camera on and off.
Camera control button (→ P.21, 27, 35)
Used to change the camera head angle
and to move the on-screen cursor.
•
^
V
<
>
:Move the camera head up,
down, left and right
respectively.
• HOME :Moves the camera head to the
center.
CANCEL button (→ P.25, 27, 35)
Cancels registration of a preset camera
position. Also cancels a setting selected
in a setting menu and returns you to the
previous level.
Number buttons (→ P.25, 36, 37)
Used to store and restore preset
positions, and to select the camera when
multiple cameras are used. The * and
# buttons are not used.
MENU button (→ P.27, 35)
Used to display and exit the MAIN
MENU.
ID button (→P.36, 37)
Used to control multiple cameras
individually. When the cameras are
switched off, pressing this button begins
individual camera control.
Battery cover
See P.20 for information on
loading the batteries.


