


MAN#650277
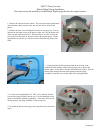
6. Remove the center gauge cluster from the vehicle. From the back
side, remove the four screws as indicated by the arrows in the photo at
left which hold the stock gauges to the bezel. The stock gauge
assembly can be set aside.
7. Leave the clear lens and gauge separator plate in the bezel and
install the four provided #6-32 x .625” standoffs in the holes that
you removed the screws from in the previous step. Take care not to
over tighten as the threaded portion standoffs can break.
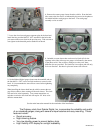
8. Included are some lenses that can be used as block offs for the
openings at the sides of the top two gauges as indicated by the arrows
in the photo at left. Due to factory changes over the years, three
different sizes are provided. The small one is not square and will only
fit in one direction. Set these in place and secure with silicone.
9. Set the Dakota Digital gauge cluster onto the standoffs and use
the four #6-32 x .250” screws and lock washers to secure it to the
bezel. It is recommended to start all four screws before tightening
any completely.
When installing the cluster back into the vehicle connect the two
gray ribbon cables to those coming off the main cluster. The clock
will need to be wired separately. Two remote mount time set
switches are wired to the clock and will require 1/4” holes to be
drilled to mount them.
See the main instruction manual for the remainder of the installation.
The Odyssey clock from Dakota Digital, Inc. incorporates the reliability and quality
of our standard gauges, along with several unique features and easy mounting. These
features include:
• Quartz accuracy.
• Night dimming feature.
• Very low standby power to prevent battery drain.
• High Visibility VFD display for sunlight readability.