


6 Tower-to-Rack Conversion Guide
Rotating the LCD Display Module
1
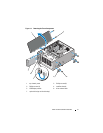
Remove the optical drive from the top (or left) drive bay of the system.
a
Disconnect the power and data cables from the back of the optical
drive. See Figure 1-1.
b
Slide the drive release latch in the direction of the arrow to release the
drive.
c
Slide the drive out to remove it from the drive bay.
2
Rotate the LCD display module 90 degrees clockwise to the horizontal
rack orientation.
3
Reinstall the optical drive in the system.
a
Align the shoulder screws on the optical drive with the drive bay screw
slots.
b
Insert the optical drive into the drive bay until the release latch locks
into place.
c
Reconnect the power and data cables to the back of the optical drive.
4
Close the system cover.
Installing the Rack Ears
1
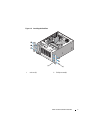
Align the rack ear screw holes with the screw holes on the right side of the
system chassis. See Figure 1-2.
2
Install the three screws using a #2 Phillips screwdriver.
3
Repeat for the left rack ear piece.
Installing the Bezel
1
Insert the tabs at the bottom of the bezel into the tab slots at the bottom
of the chassis.
2
Firmly press the top of the bezel into the chassis until the lever locks into
place.
3
Using the system key, lock the bezel.
Rack Installation
See the system’s Rack Installation Guide for the proper procedure for
installing the system in a rack.