


901268-01D
11
11
For more information, visit www.desatech.com
For more information, visit www.desatech.com
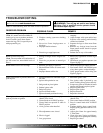
TROUBLESHOOTING
WARNING: Turn off log set and let cool before
servicing. Only a qualified service person should
service and repair log set.
POSSIBLE CAUSE REMEDY
OBSERVED PROBLEM
Note:
For additional help, visit DESA International’s technical
service web site at www.desatech.com.
Note:
All troubleshooting items are listed in order of operation.
1. Poor fuel quality
2. Fireplace venting system not drafting
properly
3. Excessive flame impingement or
blockage
4. Improper fuel/air mixture
5. Excessive gas supply/pressure
1. Passage of air/gas across irregular sur-
faces
2. Excessive gas pressure on natural gas
units
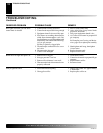
1. Incorrect gas supply or pressure
2. Blocked burner orifice or burner mani-
fold ports
3. Improper burner orifice size
1. Ignitor electrode not connected to igni-
tor cable
2. Ignitor cable pinched or wet
3. Bad ground on piezo ignitor
4. Broken ignitor cable
5. Bad piezo ignitor
6. Ignitor electrode broken
7. Ignitor electrode positioned wrong
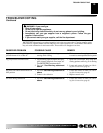
1. Gas supply turned off or equipment
shutoff valve closed
2. Control knob not in PILOT position
3. Control knob not pressed in while in
PILOT position
4. Air in gas lines when installed
5. Pilot adjustment screw closed
6. Pilot is clogged
7. Low gas pressure
Log set is smoking/sooting excessively
(
Note:
It is natural and unavoidable for
vented gas log sets to produce moderate
levels of carbon (soot) where flames
contact the logs. This is especially true
with propane/LP gas.)
Burner is excessively noisy
(
Note:
The movement and combustion of
gas will create low, unavoidable levels of
noise.)
Burner flame is too low or too high
When ignitor button is pressed, there is no
spark at pilot
When ignitor button is pressed, there is
spark at pilot but no ignition
1. Contact local natural or propane/LP gas
company
2. Adjust damper wide open and/or have
fireplace and venting professionally
cleaned and checked
3. Separate the logs to allow more flame
passage
4. Remove any foreign items from the
flame pattern and/or check for proper
orifice sizing
5. Preheat flue in very cold weather
1. Relieve any tight bends or kinks in gas
supply line
2. Check/reset gas regulator pressure (see
Figure 10, page 7)
1. Check for proper gas supply pressure
2. Free burner orifice and manifold ports
of any burrs, paint, or other blockage
3. Verify proper burner orifice sizing (see
Figure 2, page 4)
1. Reconnect ignitor cable
2. Free ignitor cable if pinched by any
metal or tubing. Keep ignitor cable dry
3. Scrape away paint on bracket for better
contact with ground on piezo ignitor
4. Replace ignitor cable
5. Replace piezo ignitor
6. Replace electrode
7. Reposition electrode
1. Turn on gas supply or open equipment
shutoff valve
2. Turn control knob to PILOT position
3. Press in control knob while in PILOT
position
4. Continue holding down control knob.
Repeat igniting operation until air is re-
moved
5. Adjust pilot flame for approximately
2" blue flame
6. Clean pilot (see Cleaning and Mainte-
nance, page 10) or replace pilot assembly
7. Replace gas control
TROUBLESHOOTING