


WARNING: The depth sounder is not to be
used for navigation or as a device to avoid
grounding which may result in boat damage
or personal injury. Always use caution
operating in shallow areas and maintain a
very slow speed. Be aware that depths may
change too quickly for you to react and avoid
grounding.
CAUTION: Disconnect the battery during
installation. Tighten nuts on the back-clamp
only slightly more than you can tighten with
your fingers. Six inch-pounds of torque are
sufficient. Over-tightening could result in
damage to the instrument and may void your
warranty.
1. It is recommended that insulated wire
terminals, preferably ring type, be used on
all connections to the power source.
2. Connect any one of the black wires to the
boat’s electrical ground, usually available at
several locations near the instrument panel.
3. Connect the purple wire to a 12 Volt
DC circuit that is activated by the ignition
switch.
4. Connect a second black wire to the water
temperature sensor ground.
5. Connect the white wire to the water
temperature white sensor signal wire.
6. Connect a third black wire to the air
temperature sensor ground
7. Connect the red wire to the air temperature
white sensor signal wire.
8. Follow the enclosed instructions for
installing the transducer with the adhesive
supplied.
9. Connect the blue wire to the “Mode”
switch positive terminal.
10. Connect the green wire to the “Down”
switch positive terminal.
11. Connect the grey wire to the “Up” switch
positive terminal.
12. Connect a black wire (ground) to each of
the switch negative terminals.
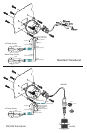
13. Once the transducer is installed and you
have lead the cable to the depth sounder,
connect the three wires (black, blue, and bare)
from the transducer to the corresponding
colored wires of the connector plug using the
butt connectors supplied. (See Illustration)
NOTES:
1.) The bare and black wire from the
transducer will need to be twisted together
and then both connected to the black wire of
the plug.
The butt connectors have a heat activated
waterproofing. When the butt connections
have been crimped, slowly apply heat with
a heat gun until you see sealant coming out
of the connector ends. It is recommended to
wrap the connections together with electrical
tape for further protection. Plug the connector
into the rear of the depth sounder.
2.) If the transducer cable is not connected
properly or not plugged into the depth
sounder, or the boat is not in the water, the
display will blink when the power is applied
to the unit.
3.) (If not part of the Transducer) Mount the
Water temperature sensor as low as possible
on the transom.
4.) Mount the Air temperature sensor
anywhere in the boat other than the engine
compartment. For best results place sensor
away from direct sun light.
General description:
1. The depth sounder will display depth of 3
feet to 199 feet. If the reading is less than 19.9
feet, 1/10th increments will be displayed. If
the reading is more than 19.9 feet, all readings
will be in whole numbers.
2. The depth sounder has an audible and
LCD displayed depth alarm with adjustable