


14
reverse video. You can silence the alarm by
pressing the [GUARD] key. When this is
done, G (ACKN) replaces G (IN) (or G
(OUT)).
Press the [GUARD] key again to reactivate
the alarm. G (IN) (or G (OUT)) replaces G
(ACKN).
Canceling the guard zone
Press and hold down the [GUARD] key until
the guard zone disappears.
Notes on the guard alarm
• When the radar range is less than one half
of the guard zone range, the guard zone
disappears from the display and UP
RANGE appears. If this happens, raise
the range to redisplay the guard zone.
• A target echo does not always mean a
landmass, reef, ships or surface objects
but can imply returns from sea surface or
precipitation. As the level of these returns
varies with environment, the operator
should properly adjust the STC, gain (sen-
sitivity), A/C RAIN and FTC to be sure
the alarm system does not overlook tar-
get echoes.
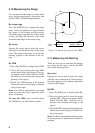
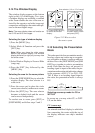
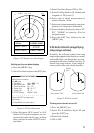
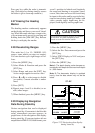
Guard zone
to set
* G (IN)
(2) Drag cursor to
top left corner of
zone and press
[GUARD].
Asterisk blinking
Drag cursor
here.
(1) Mentally create
the guard zone to set.
G (IN)
(3) Drag cursor to
bottom right corner
of zone and press
[GUARD].
(4) Guard zone
completed.
G (IN)
Guard
zone
Drag cursor
here.
Figure 2-14 How to set a guard zone
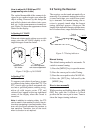
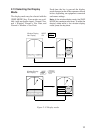
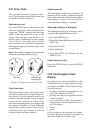
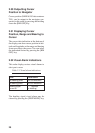
2.17 Suppressing Radar
Interference
Radar interference may occur when near an-
other shipborne radar operating in the same
frequency band as your radar. Its on-screen
appearance is many bright dots either scat-
tered at random or in the form of dotted lines
extending from the center to the edge of the
display. Figure 2-15 illustrates interference
in the form of curved spokes. Interference
effects are distinguishable from normal ech-
oes because they do not appear in the same
place on successive rotations of the scan-
ner.
Figure 2-15 Radar interference
Four levels of interference are available, in-
cluding off: IR1, IR2, IR3 and OFF. IR3
provides the highest level of rejection.
Procedure
1) Press the [MENU] key.
2) Select P/L & Int/Noise Rej & ES and
press the [ENT] key.
3) Select INT REJECT.
4) Select level desired; 2 provides the great-
est degree of interference rejection
4) Press [ENT] and [MENU].
IR and level selected appear at the top right