


3. INITIAL SETTINGS
3-4
3. Press [!] to select [HIGH] CONNECTION or [LOW] CONNECTION (whichever is
installed), and then press [+] or [-] to show the dialog box. Select CONNECTED for the
connection of transducer.
4. Press ["] or [!] to close the dialog box.
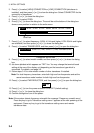
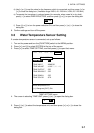
5. Press [!] to select FREQ.
6. Press [+] or [-] to show the dialog box. The scroll bar at the bottom of the dialog box
shows cursor position in relation to the entire menu.
41 kHz 45 kHz 50 kHz 67 kHz 68 kHz 88 kHz 107 kHz 150kHz
Scroll bar
7. Press [+] or [-] to select frequency, (HIGH: 41 kHz and higher, LOW: 28 kHz and higher
are available.) and then press ["] or [!] to close the dialog box.
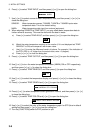
8. Press [!] to select TRANSDUCER, and then press [+] or [-] to open the dialog box.
200B-5S (1kW) 50/200-1ST (1kW) 50/200-1T (1 kW) 200B-8/8B (2 kW)
Dialog box for 200 kHz
9. Press [+] or [-] to select model number, and then press ["] or [!] to close the dialog
box.
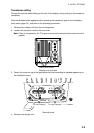
10. Jot down alphabet which appears on “TAP” line. You may change the terminal board
setting at the rear of the display unit depending on the transducer type which is
connected. For details, see page 3-5.
11. Follow steps 3-10 to enter model number of other transducer if installed.
Note: For dual-frequency transducer, enter both high and low frequencies and set the
same transducer model number for both high and low frequencies.
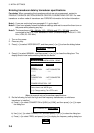
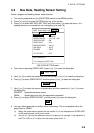
12. Press [!] to select PWR REDUCTION, and then press [+] or [-] to open the dialog box.
OFF ON
13. Press [+] or [-] to turn the power reduction ON or OFF (default setting).
14. Press ["] or [!] to close the dialog box.
15. Confirm settings and turn off the power.
Note: If the system detects frequency mismatch the message “Frequency unmatch error!
Press any key to go to Transducer setting menu.” appears at the next powering of the
equipment. Press any key to go to the transducer setting menu and reenter
transducer data.