


LEGEND
External Power
and Data
Connector
Connector
Indexing
(Alignment)
Bar
The THUMB STICK:
(When moved or pressed in, button ‘clicks’)
• Press to enter highlighted options or conrm mes-
sages.
•
Move Up/Down or Right/Left to move through lists,
highlight elds, on-screen buttons, icons, enter data
or move the map panning arrow.
•
Press in and hold for two seconds to mark your cur-
rent location as a waypoint.
4
Installing the Batteries
The eTrex Legend operates on two AA batteries (not
included), which are placed in the back of the unit. Recharge-
able Alkaline, NiMH, NiCad or Lithium batteries may be used,
but cannot be charged in the unit.
Stored data will not be lost when changing the batteries.
Battery Cover
D-Ring
Slot for Carry
Lanyard
Attachment
You can transfer optional detailed map data to the eTrex Legend
from a GARMIN MapSource® CD-ROM. Available choices
include the MetroGuide, Points of Interest (Businesses, Landmarks,
Cities, and Marine navaids), BlueChart™, Fishing Hot Spots,
Topographic maps, Roads and Recreation, and WorldMap mapping
guides.
See your Owner’s Manual for connection details.
Additional Map Data Available
Operating the eTrex Legend Operating the eTrex Legend
The Main Pages,
Setting the Time Zone
5
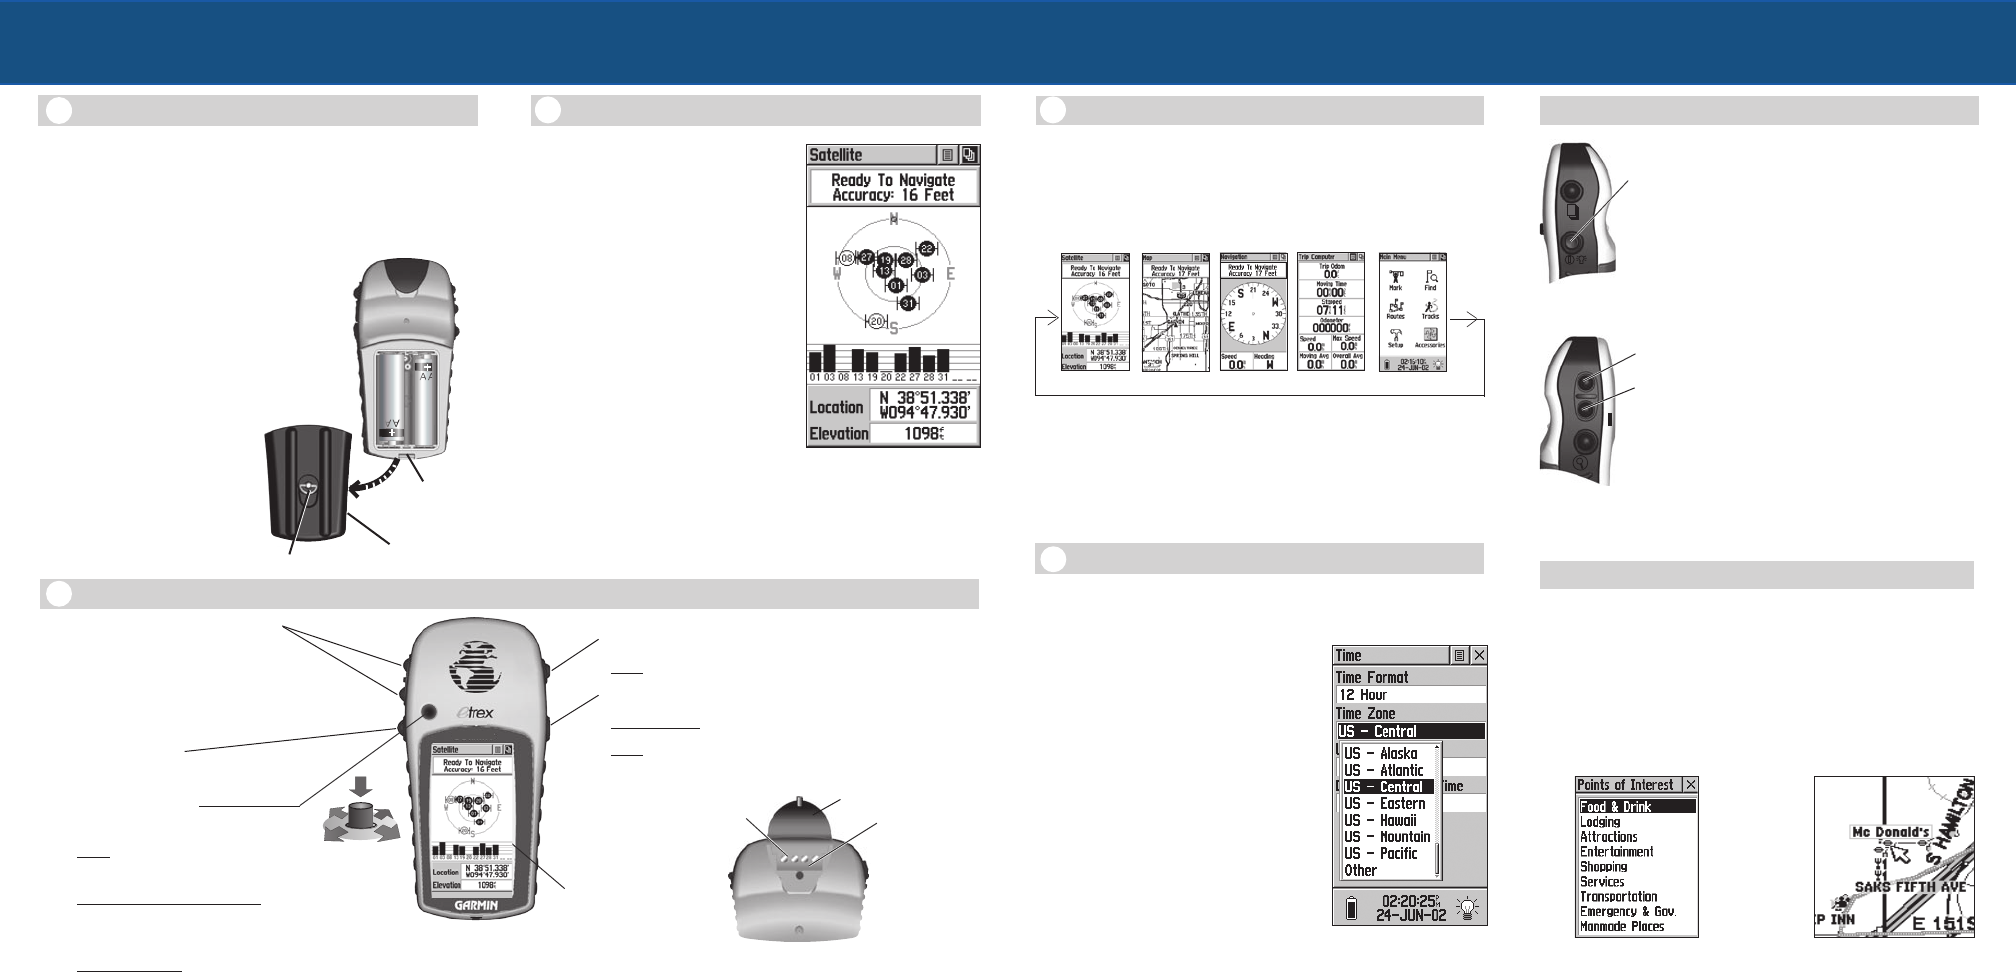
Setting the Time Zone
If the Legend is “Ready to Navigate” (Step 3) but the time
shown is not correct, you may need to change the Time Zone
selection.
To change the Time Zone:
1. Use the PAGE button to access the
Main Menu.
2. Use the THUMB STICK to high-
light the SetUp icon and then press
it in to display the SetUp Menu.
3. Use the THUMB STICK to high-
light the Time icon and then press it
in to display the Time Page.
4. Use the THUMB STICK to high-
light the ‘Time Zone’ field then
press it in to display the list of time
Backlighting/Contrast Adjustment
Adjusting Backlight/Contrast
To turn the backlight On and Off:
1. Press the POWER button to turn the
backlight On.
2. Press again to turn the backlight Off.
3. If no button is pressed (after 15
seconds*), the backlight will turn Off
automatically.
To adjust the screen contrast:
1. Use the PAGE button to access the
Satellite Page.
2. Use the ZOOM IN and OUT buttons
to adjust the contrast.
*To set the backlight feature for longer On Time,
refer to the Owner’s Manual.
1
The unit may take up to 5 minutes
to establish a position the rst time
you use it outside with a clear view of
the sky. After that, it should take only
15 to 45 seconds. When the Legend
has acquired enough satellite signals to
determine your location, a “Ready To
Navigate” message and your location
coordinates and elevation are shown.
3
Start Up Sequence
To turn the unit On:
1. Press and hold the POWER
button.
2. Press the PAGE button to
acknowledge the copyright.
3. Carefully read the warning
message and press the PAGE
button to acknowledge and
proceed to the Satellite Page.
Satellite Page:
displaying
Satellite Position,
Signal Strength, Location,
and Elevation
The FIND button:
• Press to access the Find Menu.
NOTE: While designed to be held and operated in the left hand,
the unit can be used with the right hand, if preferred.
The PAGE button:
• Press to cycle through main pages.
The POWER button:
• Press and hold to turn the unit On/Off.
• Press to toggle the backlighting On/Off.
Previewing the Main Pages
All of the information you need to operate the eTrex Legend
is found on the ve Main Pages (or display screens). To preview
these pages, press the PAGE button to cycle from one page to the
next. The ve pages are shown in order below.
Satellite Page -
Provides a visual reference of satellites being tracked.
Map Page - Displays your movements and nearby map features.
Navigation Page - Provides guidance to your destination.
Trip Computer -
Provides a variety of trip and navigation data.
Main Menu - A directory of advanced features and settings.
Satellite Page
Map Page
Navigation Page
Trip Computer
Main Menu
Points of Interest List
Map Showing Resturant
Choice
The ZOOM IN and OUT buttons:
• When on the Map Page, press to Zoom
in and out.
• When on the Satellite Page, press to
adjust the screen contrast.
Using the Button Functions
2
Protective Cover
POWER
Button
ZOOM
IN
and
OUT
Buttons
LCD
Display
5. Highlight a time zone and then press the THUMB STICK.
6. The correct time is displayed at the bottom of the page.
To install the batteries:
1. Remove the battery cover from the
back of the unit by turning the D-ring
1/4 turn counter-clockwise and pull-
ing out.
2. Insert the batteries observing proper
polarity as shown at the right.
3. Reinstall the battery
cover by turning the D-
ring 1/4 turn clockwise.