


Setup
6 313343A
Setup
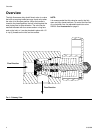
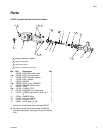
Reference parts illustration on page 7.
1. Mount the valve in place with two outlet ports
pointed in the desired direction using o-ring (14) and
four screws (11).
2. Plug the un-used outlet port with plug (15). Use
thread tape or sealant on the npt threads.
3. Use handle (12) to close the valve stem (8) clock-
wise. Position handle (12) to point in the direction
you want to show as “closed”.
4. Secure handle (12) in place on stem (8) with crown
nut (11).
Repair
Disassemble
Reference parts illustration on page 7.
1. Relieve upstream and downstream pressure. See
operation manual 312359 for Pressure Relief Pro-
cedure. Leave stem (8) in open position.
2. Clamp housing (1) in a vice. Remove nut (13) and
handle (12) from top check valve housing (10).
3. Remove cartridge assembly (10) from housing (1).
4. Remove ball (4), and spring (5).
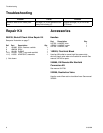
5. Use plastic tool (110) provided in repair kit 256239
to remove seat (3) and seal (2).
NOTE:
If valve housing (10) is still mounted on a machine, use
a 90° hex key to grab under seat (3) and remove from
housing (1).
6. Place handle (12) upside down on stem (8). Turn
clockwise and remove stem (8) from cartridge (10).
The seal (6) and spacer (7) will come out with the
stem. Remove seal (6) and spacer (7) from stem
(8).
7. Clean and inspect parts for wear and damage.
Replace damaged parts from repair kit 256239.
Assemble
Reference parts illustration on page 7.
1. Install o-ring (9) in groove of check valve housing
(10).
2. Start to thread stem (8) by hand into bottom of car-
tridge (10). Place handle (12) on stem (8) and turn
counter-clockwise to fully thread stem (8) through
top of cartridge (10) to full open position.
3. Insert spacer (7). Use plastic tool (110) and hammer
(not provided) to install seal (6) with lips facing away
from spacer (7) on to stem (8) until it stops against
spacer (7).
4. Place cartridge (10) in vice with bottom facing
upward. Place spring (5) and ball (4) on stem (8).
Firmly press seal (2) over lip of cartridge until it
snaps into place and holds all the parts in place.
5. Apply blue thread lock, from repair kit 256239, on
cartridge (10) external threads and insert cartridge
assembly into check valve housing (1).
6. Place housing (1) in vice and torque to 125 ft-lbs.
7. Mount valve and position handle as described in
Setup.
NOTICE
Do not install seal (6) and spacer (7) at this time to
prevent damage to seal.