


7
PERIODIC MAINTENANCE
DISPENSE NOZZLE/NEEDLE REPLACEMENT
If no material or reduced volumes of material come out of the dispense nozzle/needle it may be partially or
completely clogged. Clean with water or solvent depending on the material dispensed. A fine wire, used
cautiously, will help open clogged needles. Replace the nozzle or needle if damaged or severely clogged.
Replacement nozzles and needles can be ordered by specifying the proper part number. See the Recommended
Spare Parts section of this manual or consult the drawings for your exact model.
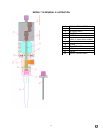
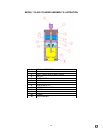
DISASSEMBLY - WET SECTION
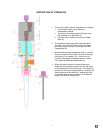
Refer to the illustration on the next page and the drawings in the back of this manual for your exact model.
1. Turn off the air supply and disconnect the air lines.
2. Turn off the material supply and remove the material line from the Material Inlet (3).
3. Remove the valve from its mounting.
4. Remove the Screws (8).
5. Pull the Material Inlet (3) away from the Air Cylinder Assembly (1).
6. Grasp the end of the Spool (2) and pull it down to the fully extended position.
7. Wipe off the Spool (2) and inspect it for wear. Remove the Spool (2) if worn.
8. Remove the Nozzle (5) or Needle (12) from the Adapter (4).
9. Remove the Adapter (4) from the Material Inlet (3).
10. Remove and discard the O-ring (7).
11. Remove the Seal Retainer (9) and Posipak Seals (6).
The 715 Dispense Valve Wet Section is now ready for cleaning and assembly.
ASSEMBLY - WET SECTION
Note: Clean all valve parts with an appropriate solvent prior to assembly. Always install new, lightly lubricated
o-rings and seals when assembling the valve. Use Krytox 203GPL (part number 84/0200-K3/11) for lubricating
valve parts including seals and o-rings. Lubricate the outside of the Spool (2) before assembly. Check the
Spool (2) for wear and if it is worn secure a replacement before proceeding.
Note: Use caution as you install new Posipak seals so that they are not pinched or torn. Do this by making sure
they are lubricated, and by tucking the lips of the seal inward before uniformly pushing them into position. Always
consult the illustrations and drawings to be sure that seals face the correct direction.
1. Install the Spool (2) if you removed it.
2. Install the O-ring (7) in the bottom end of the Material Inlet (3).
3. Install the Posipak Seal (6) in the top end of the Material Inlet (3). Some models have a single seal in this
location and some have 3 seals in this location. Check the drawings for your exact model.
4. Install the Seal Retainer (9).
5. Slide the Material Inlet (3) carefully over the Spool (2) until it seats in the Air Cylinder Assembly (1).
6. Install the Screws (8).
7. Install the other Posipak Seal (6) into the Adapter (4).
8. Screw the Adapter (4) into the Material Inlet (3), taking care that the Posipak Seal (6) slides over the extended
Spool (2) without rolling the lip .
9. Install the Nozzle (5) or Needle (12) into the Adapter (4).
Perform the Dry System Checkout, Material Loading and Wet System Checkout procedures.
The 715 Dispense Valve is now ready to be placed back in service.