


Portable Transducer
1
530508-3_A
Thank You
Thank you for choosing Humminbird®, America's #1 name in fishfinders. Humminbird® has built its reputation by
designing and manufacturing top-quality, thoroughly reliable marine equipment. Genuine Humminbird® accessories
offer the opportunity to upgrade and expand the capabilities of your Humminbird® product.
NOTE: Your transducer may not look exactly like the transducer shown in the illustrations, but it will mount in exactly
the same way.
Your Humminbird® is designed for trouble-free use in even the harshest marine environment. In the unlikely event
that your Humminbird® does require repairs, we offer an exclusive Service Policy - free of charge during the first year
after purchase, and available at a reasonable rate after the one-year period. For complete details, see the Warranty
section included in this manual.
Contact our Customer Resource Center at either 1-800-633-1468 or visit our website at www.humminbird.com.
Installation Overview
Following are instructions for the installation of this accessory. Before you start installation, we encourage you to
read these instructions carefully in order to get the full benefit from your Humminbird® accessory.
If you find that any items are missing from your installation kit, call our Customer Resource Center at
1-800-633-1468 or visit our website at www.humminbird.com.
In addition to the hardware supplied with your transducer, you will need various hand tools.
Installation
Perform the procedures in the following sections to install the transducer on your boat.
NOTE: The suction cup mount is designed for quick, easy installation and removal, NOT for high speed operation. If you
intend to operate your boat at any speed faster than trolling speeds, remove the suction cup transducer from the water.
NOTE: Humminbird
® portable transducers use either a metal or plastic bracket. The type of transducer that came with
your Humminbird
® unit will determine which bracket to use. Refer to the illustration that corresponds with your
transducer and bracket type.
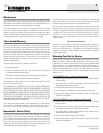
It is important that the mounting position allows the transducer to rest beneath the surface of the water, pointing
straight down. You can mount the transducer anywhere on the side of the boat if your boat remains stationary. If you
are trolling, it is best to mount the transducer on the transom of the boat.
1.
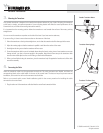
Testing the Transducer Prior to Installation
Prior to installation, test the transducer to make sure that no damage occurred during shipping.
1. After connecting the transducer to the control head, hold the transducer in the water over the side of the boat to
confirm proper operation. If the transducer is working properly, you should be able to see the bottom on the control
head display.
2.
Assembling the Mounting Bracket
NOTE: Please be aware that the transducer design has changed. If you are replacing or adding mounting hardware to
your current transducer, make sure that you have selected the appropriate hardware. If you are replacing a transducer,
you will need to replace the mounting bracket and hardware as well. Contact our Customer Resource Center at either
1-800-633-1468 or visit our website at www.humminbird.com for more information.
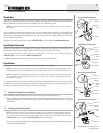
1. Assemble your transducer mounting bracket using the hardware provided and refer to the illustration that matches your
transducer mounting bracket type.
© 2006 Humminbird®, Eufaula AL, USA.
All rights reserved.
Portable Transducer
Assembly
Phillips-head
Screw
Suction
Cup
Wing-Nut
Screw
Assembling the Metal Bracket
Assembling the Plastic Bracket
Suction Cup
Portable Transducer
Assembly
Phillips-head
Screw
Lock Washer
Wing-Nut
Washer
Phillips-head
Screw
Assembling the Plastic Bracket
Assembling the Plastic Bracket
Suction Cup
Portable Transducer
Assembly
Phillips-head
Screw
Lock Washer
Wing-Nut
Washer
Phillips-head
Screw
Suction Cup
Portable Transducer
Assembly
Phillips-head
Screw
Bolt
Ratchet
Wing-Nut
Washer