


3
Recommended Tools and Supplies
Supplies are not included, unless otherwise indicated. If the dash does
not have a standard 2-1/8" (54 mm) hole, you will need a drill or saw to
make the hole. Carefully measure the dash thickness and the hole area
before cutting or drilling. The buzzer installation requires two cable ties.
If you need to extend any of the wires, use a minimum of 24-gauge wire
and wire connectors of your choice. Wire nuts or electrical tape are re-
quired to cap any unused bare wires.
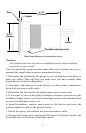
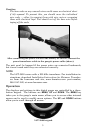
When you determine the location for the LST-3800, drill a 2-1/8" (54 mm)
hole in the dash or use an existing gauge hole. Slide the cables through
the hole from the front side of the dash, then push the LST-3800 housing
through the hole until it is flush with the dash surface. Make sure the
gauge is aligned correctly. Next, slide the rubber gasket and plastic-
mounting collar over the cables and onto the back side of the gauge.
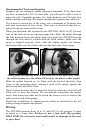
Insert gauge through the hole in the front side of the dash (left). Slide
the rubber gasket over the cables, followed by the plastic collar (right).
Slide the gasket forward so it is flush with the back of the dash, then
screw on the mounting collar, turning it until it fits snugly against the
gasket and the back of the dash.
Find a buzzer location that is protected from the elements, but still will
allow you to hear the buzzer. We recommend connecting the buzzer
wires, then using two cable ties to attach the buzzer to one or both of the
cables at the back of the gauge.
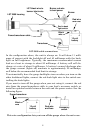
Finish the installation by connecting the cables as described in the fol-
lowing wiring diagrams and photos.
Wiring
The LST-3800 operates from 10 to 15 volts DC (12-volt system). It must
be wired to a 1-amp fuse. Failure to use a fuse with this product
WILL VOID the warranty and could result in damage to the unit
or your boat.