


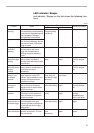

10
Adjusting the fastening torque
When you wish to drive machine screws, wood screws, hex
bolts, etc. with the predetermined torque, adjusting the fas-
tening torque as follows.
1. First remove the battery cartridge from the tool.
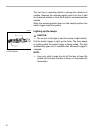
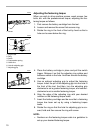
2. Loosen and remove the screw that secures ring.
3. Rotate the ring in the front of the tool by hand so that a
hole can be seen below the ring.
4. Place the battery cartridge in place and pull the switch
trigger. Release it so that the adjusting ring rotates and
becomes visible in the hole. And then remove the battery
cartridge.
5. Use an optional adjusting grip to adjust the fastening
torque. Insert the pin of the adjusting grip into the hole in
the front of the tool. And then, turn the adjusting grip
clockwise to set a greater fastening torque, and counter-
clockwise to set a smaller fastening torque.
6. Align the edge of the adjusting ring with your desired
number on the fastening torque scale.
7. Insert the battery cartridge and be sure that a fastening
torque has been set up by using a fastening torque
tester.
8. Rotate the ring so that the hole for adjusting grip is cov-
ered, hold and then secure the ring with screw.
NOTE:
• Numbers on the fastening torque scale is a guideline to
set up your desired fastening torque.
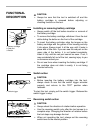
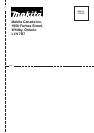
1. Screw
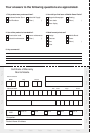
1. Angle head
2. Ring
3. Scale
4. Compression spring
5. Yellow line
6. Hole for adjusting grip
7. Adjusting grip
1
005750
1
2
3
4
7
6
5
005740
005741