


Attach the mounting hardware to the high-speed transducer as
shown in the instructions included with the transducer. Hold the
transducer with attached mounting hardware to the transom of
the boat (flush to the bottom) and mark the center of the holes
on the transom. Drill the appropriate-size holes and attach the
transducer to the transom. Tilt the rear of the transducer between
2 to 5 degrees below the transom to ensure solid contact with
the water when the boat is on plane. It may be helpful to use a
small amount of marine silicone along the leading edge of the
transducer filling in any gap between the transducer and hull.
This will help eliminate any white water or air bubbles, which can
cause random interference on the sonar display. Use caution in
applying silicone to ensure that it only comes in contact with the
leading edge of transducer, and does not smear across the face
of transducer resulting in reduced sensitivity. More-detailed
installation instructions are included with the high-speed
transducer and mounting hardware.
Puck Transducer
Puck-style transducers can be mounted on the bottom of a
trolling motor, epoxied in the hull of a fiberglass boat, or mounted
to a suction cup for portable use. Mounting to a trolling motor is
achieved with the use of a large, adjustable stainless steel hose
clamp available at most hardware or automotive stores. Slots are
included in the puck transducer for passing the clamp through
and then around the motor. Align the transducer so that it is per-
fectly centered from right to left on the bottom of the motor. If the
transducer is tilted or angled, you won’t receive a signal on your
sonar display. Do not mount the transducer next to the propeller.
Turbulence from the propeller may cause disruption in the sonar
display. In-hull mounting is designed for achieving high-speed
sonar readings in fiberglass boats. For the best readings, the
transducer must be mounted in the layer of fiberglass that is in
direct contact with the water. This is best achieved by mounting
the transducer in the area surrounding the bilge pump in the
transom area of the boat. Some boats have false bottoms
or floors.
Mounting the transducer in a location not in direct contact with
the water will result in dead air space and no sonar reading.
Once the correct area is located, the transducer is installed using
a good grade of marine epoxy. For more-detailed installation
information, refer to the directions included with the
puck transducer.
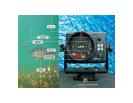
Operation
The LX-3 utilizes a combination of control knobs (Gain & Range)
and keypad (IR, ZM, UP & DN) to change or activate various
system functions. The keypad has an audible beep when a key is
depressed to indicate that a system function has been activated.
The following is an explanation of the various system functions.
Range Select - The Range select knob is used for turning the
LX-3 on or off, as well as choosing the correct depth range. The
LX-3 offers four depth ranges to choose from that can be select-
ed by rotating the knob clockwise. The depth ranges are 20, 40,
80, or 160 feet. The depth-range setting is determined by turning
the unit on and turning the Gain knob looking for a solid return
(band of light) indicating bottom on the display. If no return is
present, then select the 40-, 80-, or 160-foot range until a bottom
reading is displayed on the screen.
Gain Knob - The Gain knob controls the amount of sensitivity
required by the unit to pick up objects like bottom, weeds, fish,
smaller bait-fish, or small lures and jigs. The lower the number,
the less sensitivity. Conversely, the higher the number, the more
sensitivity. However, too much Gain (sensitivity) will result in too
much information being displayed, and it becomes difficult to
interpret the return signals. The best Gain setting is achieved by
turning up your Gain from 0 until you receive a clear and steady
bottom reading. If you’re looking for your lure or bait, turn up the
gain until you just begin to display your bait without it fading or
flickering on the screen. The lower the sensitivity, the narrower
the display segments, the easier it is to distinguish targets.
4 5