


7. Package
A bright yellow polyurethane coated nylon package is provided for
storage purposes. The package is closed by a Velcro
®
patch placed on its
cover flap. This allows the package to be opened quickly in the event of
an emergency.
OPERATING INSTRUCTIONS
A. The Buoyancy Cell
As with any type of personal protective apparel, your Mustang inflatable
will perform most effectively, and its life will be extended, if it is properly
cared for. Periodically, and prior to each use, visually inspect the fabric and
the buoyancy cell for signs of damage. Periodically test the buoyancy cell
to make certain that it does not leak by following the testing procedures
outlined in this manual. Once a month, inflate the cell by mouth until it is
firm and leave overnight. If it is airtight, the cell should still be inflated the
next day.
Also check that all seams and joints are securely sewn and that the
fabric, straps and hardware are still serviceable. At the same time, test the
oral inflation valve for leakage by immersing the valve in a glass of water.
Bubbles in the water may indicate a faulty valve. If your Mustang inflatable is
damaged, replace it immediately.
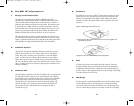
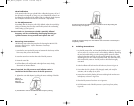
1. Deflating the Buoyancy Cell
To fully deflate the buoyancy cell, squeeze and roll up the cell gently, then
depress the top of the oral valve until all the air or gas is removed, as shown
in Figure 2. For the MD1127, the deflated buoyancy cell is then to be
returned to its storage position within the cell enclosure (see Figure 4).
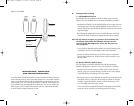
2. Inflating the Buoyancy Cell
Manual inflation
Inflation with CO2 gas is accomplished quickly and simply by pulling down
sharply on the beaded pull cord on the right hand side of the life preserver.
This action releases gas into the buoyancy cell, which then fully inflates with
in 5 seconds.
5 6
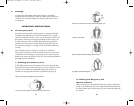
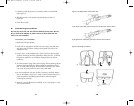
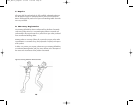
a) Insert first arm between back strap and front cover.
b) Insert second arm into other side of life preserver.
c) Fasten waist belt.
d) Pull inflation handle sharply downwards.
e) Tighten waist belt adjuster.
Figure 3: Donning and Operating Instructions
PA3007_MD1127_23Apr99 3/13/06 9:48 AM Page 8