


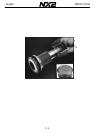


English DEPTH TH52
11-8
4.2 Bedding
Caution: Never pull, carry, or hold the transducer by its cable; this may sever internal
connections.
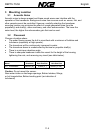
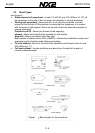
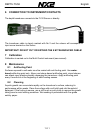
1. Remove the hull nut and any washer (see Figure 2). Also remove the cap nut and
the transducer insert.
2. Apply a 2mm (1/16") thick layer of sealant around the lip of the housing that
contacts the hull and up the sidewall of the housing, 6 mm (1/4") higher than the
combined thickness of the hull, washer(s), and the hull nut. This will ensure there is
sealant in the threads to seal the hull and to hold the hull nut securely in place.
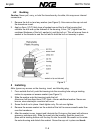
5 Installing
Note: Ignore any arrows on the housing, insert, and blanking plug.
1. From outside the hull, push the housing into the mounting hole using a twisting
motion to squeeze out excess sealant (see Figure 2).
2. Slide the washer onto the housing inside the hull
Aluminum hull less than 6mm (1/4") thick—Use an additional washer. Never use
bronze, since electrolytic corrosion will occur.
3. Screw the hull nut in place. Hand-tighten only. Do not over-tighten.
4. Remove the excess sealant on the outside of the hull to ensure smooth water flow
over the transducer.
5. After the sealant cures, inspect and lubricate the O-rings on the insert with silicone
grease or petroleum jelly. Slide the insert into the housing. Seat the insert into
place with a twisting motion until the key fits into the notch. Be careful not to rotate
the outer housing and disturb the sealant. Screw the cap nut in place and hand-
Figure 2