


2 947668
INSTALLATION
Remove the speaker enclosure from the packing
container. Using a Phillips screwdriver, remove
the two screws securing each grille to the
enclosure. Remove the grilles and remove any
hardware packed inside the enclosure.
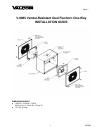
Pre-drilled 13/64” mounting holes in the side and
top of the enclosure are designed to fit a single
gang, double gang or octagon outlet box. If not
attaching to an outlet box, use the enclosure as
a template. Hold the enclosure in the desired
position on the wall/ceiling and mark the location
of mounting holes. Depending on wall/ceiling
construction type, prepare the mounting hole
locations on the wall/ceiling to securely attach
the enclosure.
Wiring may be inserted through the knockout
hole in the top or the side of the enclosure.
Insert audio wires and power wires (if needed)
through desired hole. Use mounting hardware
(not included) appropriate for the wall/ceiling
type to securely mount the enclosure to the
wall/ceiling.
Connect the audio wires to the Green (Tip/A)
and Red (Ring/B) leads on the Flexhorn
speakers. Connect the power wires to the White
(-24VDC) and Black (GND) leads on the
Flexhorn speakers. The Flexhorns will have to
be removed from the grille assemblies (remove
the four #8-32 KEPS nuts from each grille) to
adjust the volume. The volume control is
accessible on the front of the cone on the
Flexhorn. After the volume is adjusted, attach
the Flexhorns to the grille assemblies.
Align each grille/speaker assembly with the
enclosure, and install the four supplied tamper-
resistant screws through the grille into the
enclosure. Use the supplied security hex bit to
tighten the screws securely.
TECHNICAL ASSISTANCE
Assistance is available from the factory when
problems are encountered. Call (540) 563-2000
and press 1 for Technical Support or visit our
website at http://www.valcom.com.
Valcom equipment is not field repairable.
Valcom, Inc. maintains service facilities in
Roanoke, VA. Should repairs be necessary,
attach a tag to the unit clearly stating company
name, address, phone number, contact person
and the nature of the problem. Send the unit to:
Valcom, Inc.
Repair and Return Dept.
5614 Hollins Road
Roanoke, VA 24019-5056
VALCOM LIMITED WARRANTY
Valcom, Inc. warrants its products to be free from defects in materials and workmanship under conditions of normal use and service
for a period of one year from the date of shipment. The obligation under this warranty shall be limited to the replacement, repair or
refund of any such defective device within the warranty period, provided that:
1. inspection by Valcom, Inc. indicates the validity of the claim;
2. the defect is not the result of damage, misuse or negligence after the original shipment;
3. the product has not been altered in any way or repaired by others and that factory sealed units are unopened (a service charge
plus parts and labor will be applied to units defaced or physically damaged);
4. freight charges for the return of products to Valcom are prepaid;
5. all units 'out of warranty' are subject to a service charge. The service charge will cover minor repairs (major repairs will be
subject to additional charges for parts and labor).
This warranty is in lieu of and excludes all other warranties, expressed or implied and in no event shall Valcom, Inc. be liable for any
anticipated profits, consequential damages, loss of time or other losses incurred by the buyer in connection with the purchase,
operation or use of the product.
This warranty specifically excludes damage incurred in shipment. In the event a product is received in damaged condition, the
carrier should be notified immediately. Claims for such damage should be filed with the carrier involved in accordance with the
F.O.B. point.
Headquarters:
Valcom, Inc.
5614 Hollins Road
Roanoke, VA 24019-5056
Phone: (540) 563-2000