SBB00101-1-1007Page 16
OPERATION
Checking for Gas Leaks
Check for gas leaks every time you connect your Superb by
Broilmaster
®
propane gas grill to a Propane gas cylinder, when a
connected cylinder has not been used recently, or when either a
natural or propane grill is being used for the first time.
Caution: Do not use a flame when checking for leaks. Checking
for leaks with a flame may lead to a fire or explosion, resulting
in property damage or personal injury.
To check for gas leaks:
1. Use dish washing liquid and a little water to make a soapy
solution.
2. Turn OFF the knobs on the control panel.
3. Turn ON the gas at the supply or cylinder. A hissing sound
indicates a leak. Turn OFF the gas and repair the leak.
4. Apply the soapy water solution to all gas connections.
5. Look for bubbles. Bubbles indicate a leak.
6. If there are bubbles turn OFF the gas and repair the leak.
7. Turn the gas back ON and repeat the above procedures until
all leaks are repaired.
Air Shutter Adjustment
1. Remove cooking grids and flame tamers from grill.
2. Ignite burners on grill and observe flame pattern. If flame is
yellow in color or flame is lifting off burner the air shutter on
burner will require adjustment.
3. Turn gas OFF and allow the grill to cool.
4. Loosen two (2) Phillips screws at end of each burner. Lift
upward and pivot burner out of grill.
5. Loosen Phillips screw at air shutter. Open air shutter for a
yellow flame or close air shutter for a lifting flame. Tighten
Phillips screw at air shutter.
6. Replace burners into grill. Tighten two (2) Phillips screws at
end of each burner.
7. Ignite burners on grill to verify burner flame characteristics.
OPERATING INSTRUCTIONS
Using the Ignitor
Caution: If a burner fails to light after 5 seconds, turn the
burner OFF for 5 minutes, to allow the gas to clear, then try
again.
Attention: You should use the center burner(s) to ignite the first
burner, then move from center to both sides.
Attention: The control knob that is second from left side of grill
is for the rotisserie. See Rotisserie Operation on page 12.
1. Turn the right control knob clockwise
to the OFF
position.
2. Turn ON gas supply to the grill.
3. With the grill lid open, push and turn the right control knob
counterclockwise to HI.
4. Push and hold in the ignitor button until the right burner ig-
nites.
5. If right burner does not ignite, turn right control knob clockwise
to the OFF position. Turn OFF gas supply to grill.
Refer to Troubleshooting section in this manual.
OPERATING INSTRUCTIONS
Using Matches
Caution: If a burner fails to light after 5 seconds, turn the
burner OFF for 5 minutes, to allow the gas to clear, then try
again.
Attention: You must use the control knob on the right side of the
grill to ignite the first burner. The second burner to be ignited will
be the second from right side of grill and so forth, always moving
from right to left.
Attention: The control knob that is second from left side of grill is
for the rotisserie. See Rotisserie Operation on page 12.
1. Turn the right control knob clockwise to the OFF
position.
2. Turn ON gas supply to the grill.
3. Open the grill lid.
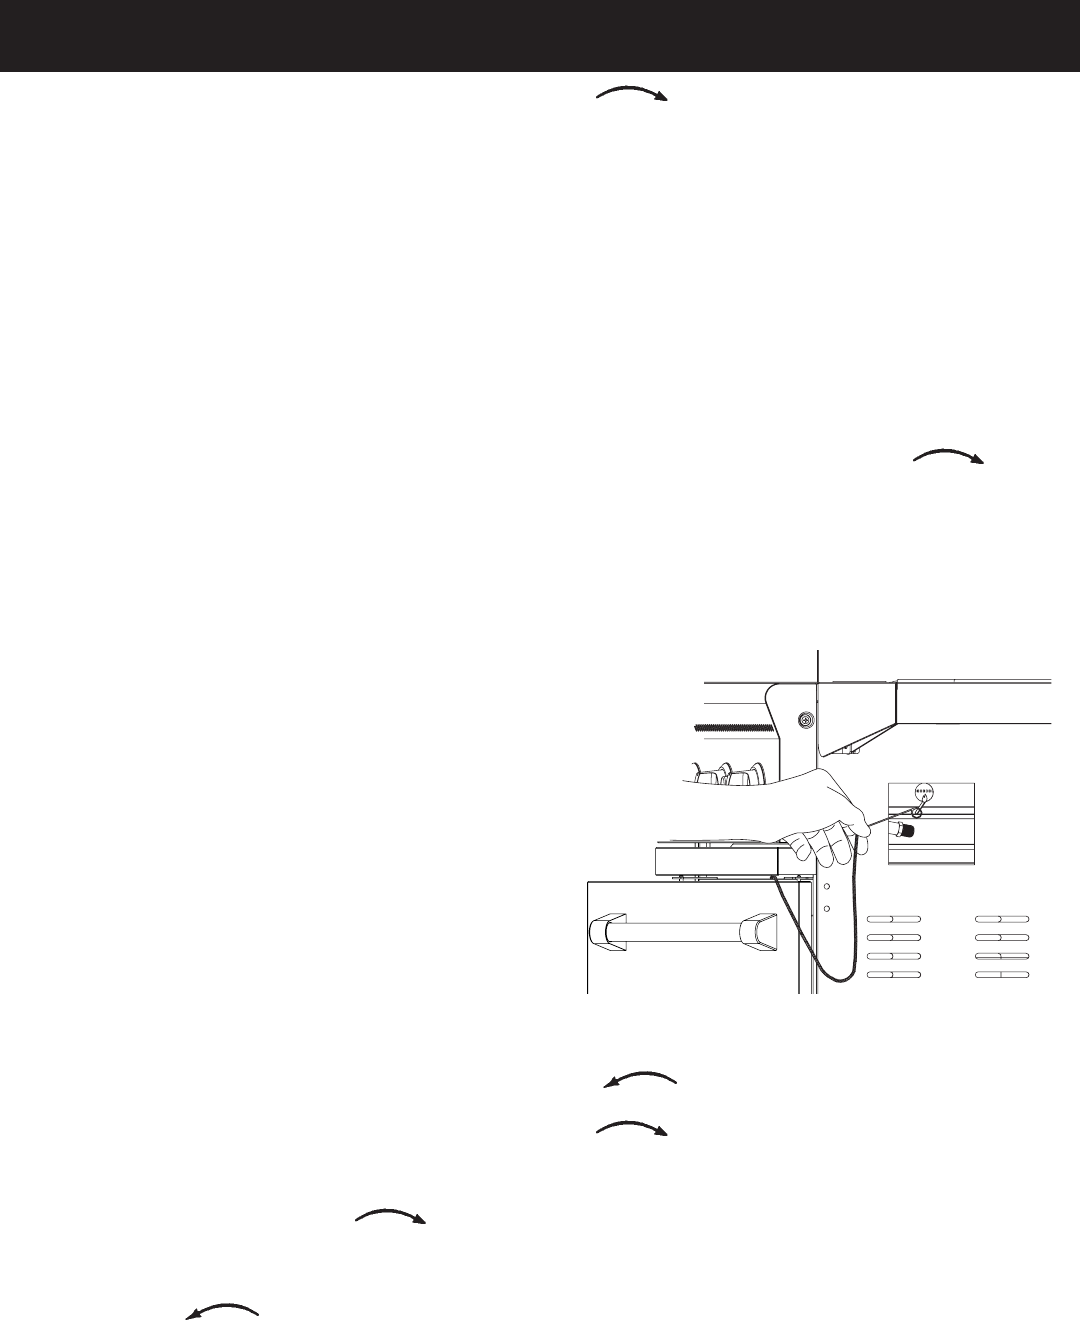
4. A match holder is attached on the inside of the right door. Place
a match into match holder. Insert burning match through the
lighter hole on right cart side. Place burning match adjacent
to right burner.
Figure 19
5. Push and turn the right control knob counterclockwise
to HI.
6. If right burner does not ignite, turn right control knob clockwise
to the OFF position. Turn OFF gas supply to grill.
Refer to Troubleshooting section in this manual.
