5
BLENDER ASSEMBLY INSTRUCTIONS
NOTE: Before assembling, make sure the cord is unplugged.
CAUTION: Use extreme care when handling the Blade Assembly.
Do not touch Blades with your fingers. The Blades are very
sharp and can cause injury if touched.
1. Carefully place the Rubber Seal Ring
over the Blade Assembly.
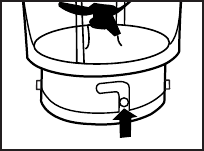
2. Place the Blade Assembly in the
Blending Jar by lining up the two tabs
on the side of the Blade assembly with
the two slots on the Blending Jar (see
Figure 2).
3. Push up and turn the Blade Assembly clockwise to firmly
secure it into position on the Blending Jar. To remove, turn
Blade assembly counterclockwise and pull down.
4. Carefully place the Blending Jar over the Motor Housing by
aligning the notches on the bottom of the jar with the grooves
in the base.
5. Once Blending Jar is in place, turn clockwise until the Blending
Jar locks into position.
NOTE: The Collar and Blade must be firmly attached to
the Blending Jar before putting any foods or liquids into the
Blending Jar.
OPERATING INSTRUCTIONS
CAUTION: Keep hands and utensils out of the Blending Jar while
blending to prevent the possibility of severe injury to persons
or damage to the unit. A scraper may be used but must only
be used when the unit is not running.
CAUTION: Use extreme care when handling the Blender Blade.
Do not touch Blades with your fingers. The Blades are very
sharp and can cause injury if touched.
1. Before starting, make sure power cord is unplugged.
2. Make sure that the Blade Assembly, Rubber Seal Ring, and
Collar are properly assembled and securely fastened to the
Blending Jar. See Assembly Instructions for details.
3. Place the Blending Jar on top of the Motor Housing making sure
it is securely locked into the Motor Housing.
Figure 2
TMR_TMBL2_IB_3-7-06 7/3/06 4:14 PM Page 5
