


2
Installation Instructions
Start-Up
Before operating the reducer or gearmotor, the following must be done:
• Installthedriveonarigidandvibration-freesurface.
• Removetheprotectivecoatingontheshaftandange.Usesolventifnecessary.
• Carefullyinstallcoupling,sheaves,sprockets,orpinionsonshaft.Mountasclosetotheshaftshoulderas
possible.
• Itispreferabletouseheatinsteadofforce.Do not hammer on shaft!
• Checkshaftalignmentwhenusingdirectcoupling.
• Checkshaftparallelismwhenusingbeltorchaindrive.
CAUTION: Refer to belt manufacturer's recommendation for belt tension.
(Tension should not be applied on chain drives.)
• Checkoillevelinoillubricatedreducer.
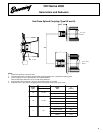
• Installbreatherplugintheplugholeperrecommendationsshownonpage(3).Remove pin from center of
breather plug if breather design is per diagram below.
Maintenance
To ensure safe operation and to avoid problems, it is recommended the reducer or gearmotor be inspected every 50
hours of operating time.
• Checkmountingboltsandbelttension(ifapplicable).
The preventative maintenance list below should be performed every 5000 hours of operating time:
• Checkoillevelandaddoilifnecessary.
• Makesuretheventholeinthebreatherisclean.
• Reducerbreathersnotsuppliedwithcross-pindonotgetmodiedbutmustbeproperlypositionedatthetop
of the reducer.
• Formotor/couplingmountingofreducerswithonepiecesplinedcouplings,refertoinstructionsincludedon
page 6 of this manual.
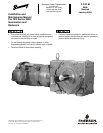
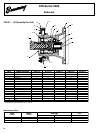
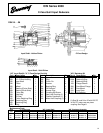
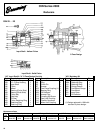
OtN Series 2000
Gearmotors and Reducers
PIN