


CLEAR BLUE HAWAI I
2123 Eluwene St. Honolulu, HI 96819
TOLL FREE : 1-877-777-6708
INTERNATIONAL : 1-707-202-8346 FAX : 1-707-317-5367
www.clearbluehawaii.com
Molokai Kayak Instructions
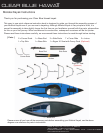
Insert cross ribs
[ Assembly ]
Install cross rib (A) first
Cross rib (A) is the largest piece and is installed at the center of the base rod. When clipped
together, secure the side rib to the base rod by wrapping the black rubber band around the top
of the clip (see previous image)
1.
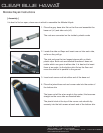
Cross rib (A) and (B2) are very similar, please ensure you have the right
part, cross rib (A) is wider when put against (B2).
Lock the cross rib onto the side rod
The end of each cross rib has a lockable clip, when it is at
a right angle to the side rod, it is unlocked. To lock the
clip, push it towards the side of the kayak
2.
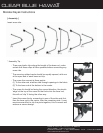
Mount cross ribs (B1) and (B2)
The rear of Molokai Kayak will be where (B1) is installed,
this is behind cross rib (A) at the opposite side to the clear
viewing panel.
3.
Insert the final four cross ribs, (C) and (D)
As the remaining ribs are installed the kayak will begin to take shape and the base rod will
become straight. The final few pieces may require more effort than the earlier cross ribs, again
this is normal as the kayak frame is completed and gains strength.
4.
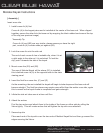
Attach the arches
Find the two arches and attach them to the inside of the frame on either side by rolling the
Velcro tightly. This will create arches that will tighten the top skin once attached.
6.
Secure top skin
Place each end of the top skin over the two ends of Molokai Kayak first and then go around the
edges securing the Velcro.
7.
Inflate the side air tubes one at a time until firm
5.
*Assembly Tip