


24
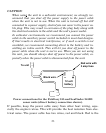
positive lead, black is negative or ground. Make sure to attach the in-
line fuse holder to the red lead as close to the power source as possible.
For example, if you have to extend the power cable to the battery or
power buss, attach one end of the fuse holder directly to the battery or
power buss. This will protect both the unit and the power cable in the
event of a short. It uses a 3-amp fuse.
Caution:
Do not use this product without a 3-amp fuse wired into the
power cable! Failure to use a 3-amp fuse will void your war-
ranty.
This unit has reverse polarity protection. No damage will occur if the
power wires are reversed. However, the unit will not work until the
wires are attached correctly.
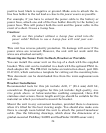
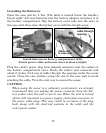
Mounting the Sonar Unit: In-Dash, Bracket or Portable
You can install the sonar unit on the top of a dash with the supplied
bracket. This unit can be installed in a dash with the optional FM-6 in-
dash adapter kit. The FM-6 kit includes an instruction sheet, part 988-
0147-631, which contains a template for cutting out the mounting hole.
This document can be downloaded free from the www.eaglesonar.com
web site.
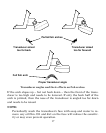
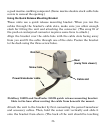
Bracket Installation
Recommended tools for this job include: drill, 1" (25.4 mm) drill bit,
screwdriver. Required supplies for this job include: high quality, ma-
rine grade above- or below-waterline caulking compound, three #10
stainless steel screws. Screw length and type should be suitable for the
material on which you intend to mount the bracket.
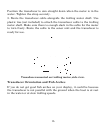
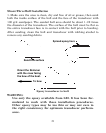
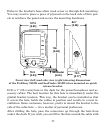
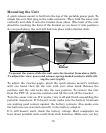
Mount the unit in any convenient location, provided there is clearance
when it’s tilted for the best viewing angle. You should also make sure
there is enough room behind the unit to attach the power/transducer
cable. (See the following drawings, which show the dimensions of a
gimbal-mounted FishEasy 245DS and SeaFinder 245DS sonar unit.)