


6
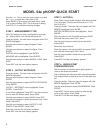
MODEL 54e pH/ORP QUICK START
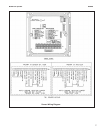
Use the ↓ or � key to move the cursor down or up and
the → or ← to move the cursor right or left.
Press ENTER (F4) to move to the next menu, SAVE
(F4) to store a setting, EDIT (F4) to change a setting,
and EXIT (F1) to exit without saving changes.
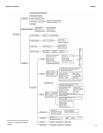
STEP 1 - MEASUREMENT TYPE
Note: The analyzer is factory configured for a pH sen-
sor. Skip to step 2 if you will be measuring pH.
Press any button. he main menu will appear with CALI-
BRATE highlighted.
Use the arrow buttons to select Program. Press
ENTER.
Use the arrow buttons to select Configure. Press
ENTER.
DISPLAY will be highlighted. Press ENTER.
MEASURE will be highlighted. Press ENTER.
Use the arrow buttons to select REDOX or ORP. Press
SAVE.
Press EXIT until the main display appears.
STEP 2 - OUTPUT SETPOINTS
Press any button. The main menu will appear with CAL-
IBRATE highlighted.
Use the arrow buttons to select Program. Press
ENTER.
Use the arrow buttons to select OUTPUT SETPOINTS.
Press ENTER.
OUTPUT 1 SETPOINTS will be highlighted. Press
ENTER. Press CONT.
4 mA will be highlighted. Press EDIT. Use the arrow but-
tons to enter the desired value. Press SAVE.
Use the arrow buttons to select 20 MA. Press EDIT.
Use the arrow buttons to enter the desired value. Press
SAVE. Press EXIT.
Use the arrow buttons to select OUTPUT 2 SET-
POINTS. Press ENTER. Press CONT.
Enter the 4 mA and 20 mA values as above.
Press EXIT until the main display appears.
STEP 3 - AUTOCAL
Note: Obtain two pH buffer solutions with values at least
2 pH units apart. (Factory set buffers are 4.01, 7.00,
and 10.01 pH.)
Press any button. The main menu will appear with CAL-
IBRATE highlighted. Press ENTER.
BUFFER CALIBRATION will be highlighted. Press
ENTER.
Place the sensor in the first buffer and press CONT.
Wait until the screen reads "Buf 1 done."
Use the arrow buttons to select the correct buffer.
Press CONT.
Rinse and dry the sensor.
Place the sensor in the second buffer and press CONT.
Wait until the screen reads "Buf 2 done."
Use the arrow buttons to select the correct buffer.
Press CONT.
Press EXIT until the main display appears.
STEP 4 - SINGLE-POINT
STANDARDIZATION
After the sensor is installed, take a grab sample as
close to the sensor as possible.
Use a calibrated pH instrument with automatic tempera-
ture compensation to determine the pH of the grab sam-
ple.
Press any button. The main menu will appear with CAL-
IBRATE highlighted. Press ENTER.
Use the arrow buttons to select STANDARDIZE. Press
ENTER.
Press EDIT. Use the arrow buttons to enter the pH
value of the sample. Press SAVE.
Press EXIT until the main display appears.
MODEL 54e pH/ORP QUICK START