


5GPSMAP 3000 Series Installation Instructions
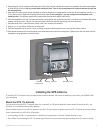
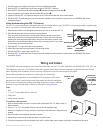
4. Thread the pole-mount adapter onto the pole. Do not overtighten the adapter.
5. Route the
GPS 17x cable
through the pole and connect it to the GPS 17x antenna.
6. Place the GPS 17x antenna on the pole-mount adapter ➊ and twist it clockwise to lock it in place ➋.
7. Secure the antenna to the adapter with the included M3 set screw ➌.
8. (Optional)WiththeGPS17xinstalledonthepolemount,lltheverticalcableslotwithamarinesealant.
9. Route the GPS 17x cable away from sources of electronic interference, and connect it to power and to your GPSMAP 3000 series
chartplotter (Page 6).
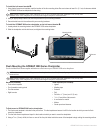
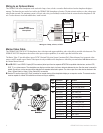
Under-deck-mounting the GPS 17x Antenna
The GPS 17x can be mounted under a berglass surface with the included adhesive pads. The GPS 17x will not acquire satellite signals through
metal—you can only use the under-deck mount under a berglass surface.
1. DeterminethelocationontheberglasssurfacewhereyouwanttomounttheGPS17x.
2. Place the adhesive pads on the under-deck mounting bracket.
There are holes in the under-deck mounting bracket that can be used to secure the
under-deck mount to the mounting surface with screws. Garmin does not recommend
attaching the under-deck mounting bracket to the surface with screws, because of the
likelihood that screws will extend beyond the top of the mounting surface. If you choose
to use screws, do so with extreme care.
3. Place the GPS 17x in the under-deck mounting bracket.
4. Adhere the under-deck mounting bracket to the mounting surface.
5. Connect the GPS 17x cable cable to the GPS 17x.
6. Route the GPS 17x cable away from sources of electronic interference, and connect it to power and to your GPSMAP 3000 series
chartplotter (Page 6).
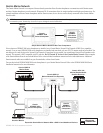
Wiring and Cables
The GPSMAP 3000 series chartplotter comes with a Power/data cable, and a GPS 17x cable. Additionally, the GPSMAP 3006, 3206, 3010, and
3210 chartplotters come with a 17-pin Marine Video cable. Optional Garmin Marine Network components use specialized Garmin Network
cables. Depending on the installation, it may be necessary to drill holes to route the connector end of these cables.
Garmin rubber grommets are provided to cover these holes for a nished look.
You may not need the grommets in some installations. The grommets do NOT create a
waterproof seal. Apply a marine sealant around the grommet and cable after installation.
Be sure to test the system before installing and sealing the grommets. Purchase additional
grommets from your Garmin dealer or directly from Garmin at www.garmin.com.
Tools
Drill
1
1
/
4
in. (31.7 mm) paddle drill bit or hole saw
Utility knife
Marine sealant (optional)
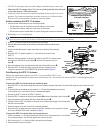
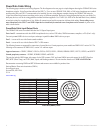
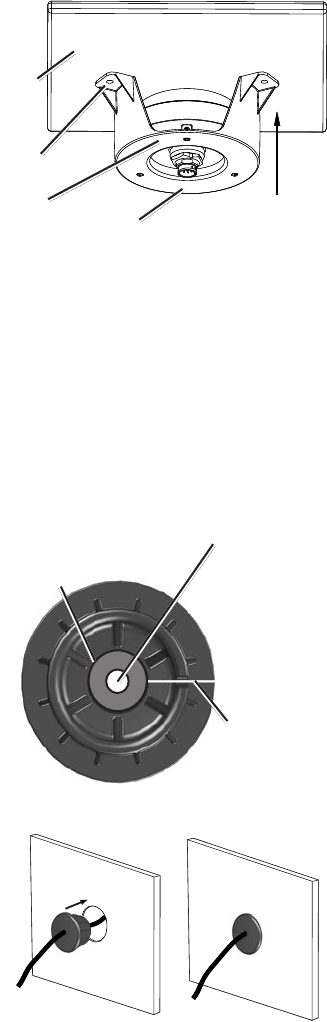
To install the cable grommet:
1. Mark the location where you want to route the cable (Power/data, GPS 17x, Marine Video, or
Marine Network.)
2. Using a 1
1
/
4
in. (31.7 mm) paddle drill bit or hole saw, drill the installation hole.
3. Refer to the diagram for trimming instructions. Carefully trim the cable hole in the grommet, as
needed.
4. Route the cable to the chartplotter, and test the system.
5. Spread the grommet apart at the split and place it around the cable.
6. Firmly push the grommet into the installation hole until it is seated. Apply marine sealant, as needed, to weatherproof the cable.
•
•
•
•
GPS 17x
antenna
Under-deck-
mounting bracket
Mounting
surface
Adhesive pads
GPS 17x
antenna
Under-deck-
mounting bracket
Mounting
surface
Adhesive pads
Split
Use this hole
(no trim) for the
power, NMEA,
Marine Network,
or
GPS 17x cable.
Trim to this line for
the Marine Video
cable.
Split
Use this hole
(no trim) for the
power, NMEA,
Marine Network,
or
GPS 17x cable.
Trim to this line for
the Marine Video
cable.