


2 VHF 100/200 Series Radio Installation Instructions
Installing your VHF 100/200 Series Radio
1. Select a location (page 2).
2. Mount the radio (page 2).
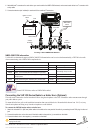
3. Connect the radio to power (page 4).
4. Connect the radio to an antenna (page 5).
5 Mount the microphone hangar (page 5).
Although they are not necessary to use your radio, these instructions cover the following additional installation options.
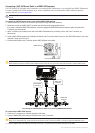
Connecting the radio to a chartplotter (page 5)
Connecting the radio to a hailer horn (page 7)
Connecting the radio to an external speaker (page 8)
Connecting the GHS
™
10 or GHS 10i handset or a relocation microphone (page 8)
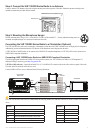
Step 1: Select a Location for the VHF 100/200 Series Radio
Consider the following when you select an installation location:
Provides optimal viewing.
Allows easy access to the radio controls and handset.
Is strong enough to support the weight of the radio and protect it from excessive vibration or shock.
Allows room for the routing and connection of the cables for power and data. There should be at least 5 in. (127 mm) of clearance
behind the case.
Is located at least 20 in. (500 mm) from a magnetic compass.
Is in an area that minimizes exposure to extreme weather conditions.
NOTE: The temperature range for the VHF 100/200 series radios is from 14°F to 122°F (from -10°C to 50°C). Extended exposure to temperatures
outside this range (in storage or operating conditions) may cause failure of the LCD screen or other components. This type of failure and related
consequences are not covered by the manufacturer’s limited warranty.
Step 2: Mount the VHF 100/200 Series Radio
You can mount your radio in one of two ways:
Bail Mount—mount the radio onto the bracket that attaches to the console or overhead.
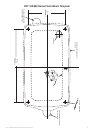
Flush Mount—use the ush-mount kit to mount the radio into a at panel.
Bail Mounting the VHF 100/200 Series Radio
In addition to the included mounting bracket, mounting knobs, and three of the 4.2 × 25 mm panhead mounting screws, bail mounting the
VHF 100/200 series radio requires the following tools (not included):
Phillips screwdriver
Drill and 9/64 in. (3.5 mm) drill bit
Center punch and hammer
Customer-supplied mounting hardware (optional) - bolts, nuts, and washers
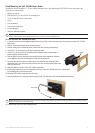
To mount the bracket assembly:
1. Using the base of the bracket as a template, mark the location of the three holes (two screws towards the front, one screw towards the
back).
2. Using the center punch, indent the center of each of the three mounting-hole locations.
3. Drill the mounting holes, using a 9/64 in. (3.5 mm) drill bit
4. Secure the base with the three 4.2 × 25 mm included screws or, if desired, secure with appropriate bolts, nuts, and washers (not
included).
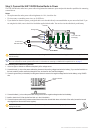
To install the VHF 100/200 series radio on the mounting bracket:
1. Loosely attach the mounting knobs to the VHF 100/200 series radio.
2. Slide the radio onto the mounting bracket, and tighten the mounting knobs.
•
•
•
•
•
•
•
•
•
•
•
•
•
•
•
•