


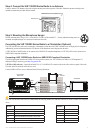


VHF 100/200 Series Radio Installation Instructions 3
Flush Mounting the VHF 100/200 Series Radio
In addition to the four included 4.2 × 25 mm, panhead mounting screws, ush mounting the VHF 100/200 series radio requires the
following tools (not included):
Phillips screwdriver
Drill and 9/64 in. (3.5 mm) drill bit for mounting holes
3/8 in. (10 mm) drill bit for a starter hole
Jigsaw
Scissors and tape
Center punch and hammer
File and sandpaper
Anti-seize lubricant (optional)
NOTE: Ensure that the surface on which you mount the VHF 100/200 series radio has sufcient open space behind it to accommodate the radio
and the connected cables. There should be at least 5 in. (127 mm) of clearance behind the case.
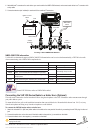
To ush mount the VHF 100/200 series radio:
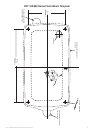
1. Cutandtrimtheush-mounttemplate(page 9)andensureitwilltinthelocationwhereyouwanttoushmounttheVHF100/200
series radio.
2. Tapetheush-mounttemplatetothemountinglocation.
3. Use the center punch to indent the center of each of the four mounting-hole locations.
4. Use a 9/64 in. (3.5 mm) drill bit to drill the four mounting holes.
5. Use a 3/8 in. (10 mm) drill bit to drill a starter hole inside the corner of the template to
begin cutting the mounting surface.
6. Use the jigsaw to cut the mounting surface along the inside of the dashed line indicated
onthetemplate.Usealeandsandpapertorenethesizeofthehole.
7. Placetheradiointothecutouttoconrmthatthefourmountingholesarecorrectafter
reningthehole.Ifnot,markthecorrectlocationsofthefourmountingholes.Removethe
radio from the cutout.
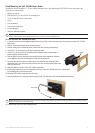
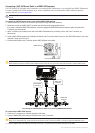
8. Apply the gasket to the back of the VHF 100/200 series radio.
9. IfthetopandbottomsnapcoversareattachedtothefrontoftheVHF100/200seriesradio,removethem
by unsnapping the covers from the sides.
10. Place the VHF 100/200 series radio into the cutout.
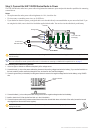
11. Securely tighten the four mounting screws through the VHF 100/200 series radio into the drilled mounting holes.
Snap covers
NOTE: Stainless-steel screws may bind when screwed into berglass and overtightened. Garmin recommends applying an anti-galling, stainless,
anti-seize lubricant to the screw before using.
12. Place the snap covers over the mounting screws.
•
•
•
•
•
•
•
•
Gasket