


GMR 20/40 Radar Installation Instructions
5
Powering on the System
To power on the scanner:
1. On the MFD (Multi-Function Display), press the red Power key. The scanner is automatically powered on with the MFD. The Welcome
page appears showing the GMR 20 or GMR 40 as a detected Network Connection.
2. Press ENTER when I Agree turns yellow, then press PAGE until the Radar page appears.
3. During Standby mode, a countdown appears on the Radar page and the status bar as the scanner prepares to operate.
4. With the scanner “Ready”, press and hold the FCTN key until Do you want to begin radar transmission? appears.
5. When safe (personnel clear of radar beam path), highlight Yes and press ENTER. The scanner spins up and becomes operational.
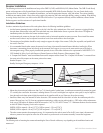
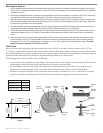
Bearing Offset
It may be necessary to adjust the bearing of the radar picture shown on the screen. First, using a magnetic compass, take an optical bearing of a
stationary target located within viewable range. Measure the target bearing on the radar. If the bearing deviation is more than +/- 1°, then do the
following to correct for the offset:
1. From the Radar page, press the ADJ key to display the Adjustment Menu.
2. From the Adjustment Menu, select Setup and press ENTER.
3. Using the ROCKER key, highlight the Front of Boat Offset slider and press ENTER.
4. Press Left on the ROCKER key to adjust to a negative value or press Right to adjust to a positive value. The preview window below
changes as you adjust the slider.
5. Once an offset has been determined, press ENTER to save, then press QUIT to return to the Radar Page. Your new Garmin Marine
Radar is now ready to use! Refer to the GMR 20/40 Owner’s Manual for details on operating the scanner.