


Repair
8 312375J
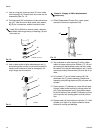
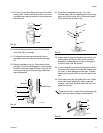
12. Torque cartridge (3) to specified torque listed in the
following table.
13. Slide packing nut/wet cup (9) over displacement rod
(1) and torque to specified torque listed in the follow-
ing table.
14. Fill wet cup (9) 1/3 full of TSL or compatible solvent.
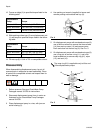
Disassembly
When disassembling displacement pump, lay out all
removed parts in sequence to ease reassembly. Clean
all parts with a compatible solvent and inspect them for
wear or damage.
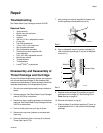
1. Relieve pressure. See your Check-Mate Pump
Packages manual 312376 for instructions.
2. Disconnect displacement pump from air motor as
illustrated in your Check-Mate Pump Packages
manual 312376.
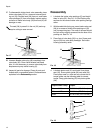
3. Place displacement pump in a vise, with jaws on
outlet housing (2).
4. Use packing nut wrench (supplied) to loosen and
remove packing nut/enclosed wet cup (9).
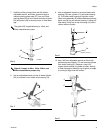
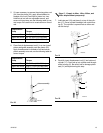
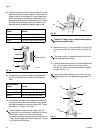
5. On displacement pumps with enclosed wet cups (9),
use an M4 hex wrench to remove the three screws
(14) from wet cup cover (10) and remove cover.
Drain and clean out the wet cup (9). See F
IG. 5.
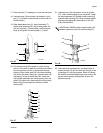
6. On displacement pumps with enclosed wet cups (9),
use o-ring pick to remove o-ring (11), and a flat
head screwdriver to remove snap ring (61), wiper
(15), and seal (16).
Displacement
Pump Torque
60cc and 100cc 90-130 ft-lbs (122-173 N•m)
200cc and 250cc 130-190 ft-lbs (176-258 N•m)
500cc 149-261 ft-lbs (203-355 N•m)
Displacement
Pump Torque
60cc and 100cc 28-44 ft-lbs (38-59 N•m)
200cc and 250cc 95-115 ft-lbs (128-155 N•m)
500cc 95-115 ft-lbs (128-155 N•m)
FIG. 4
The snap ring (61) is applicable only to 60cc and
100cc displacement pumps.
F
IG. 5
9
ti10623a
ti10561a
10
61
11
16
14
9
15