


Page 6
SKU 92247 For technical questions, please call 1-800-444-3353
Operation
1. Select a dry log or other wood stock to cut.
The stock should be no longer than the band saw table. Otherwise, the Saw Mill
Guide Slide (1) may come out of the table guide slot. Check for preexisting nails or
screws in the wood stock and remove before cutting.
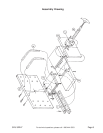
2. Turn the Acme Screw Knob (8) counterclockwise to bring the Mounting Plate all the
way back.
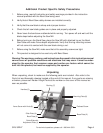
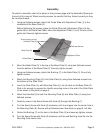
3. Place the Saw Mill on a flat surface to mount the wood stock.
4. Select the side of the wood stock for the first cut, and place the opposite side against
the Mounting Plate (6).
5. Select holes on opposite ends of the Mounting Plate (6) to insert holding screws (not
supplied). Screw in until wood stock cannot move. Use at least one screw at each
end. See photo below-left.
Use 1-1/4 inch wood or sheet-rock screws. For irregular shaped wood stock, find a
hole in the Mounting Plate that comes the closest to the surface of the wood stock.
This will keep the wood stock more stable during cutting.
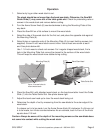
6. Place the Saw Mill, with attached wood stock, on the band saw table. Insert the Guide
Slide (1) into the Table Guide Slot. See photo above-right.
7. Adjust the band saw head up to clear the wood stock being cut.
8. Determine the depth of cut by measuring from the saw blade to the outer edge of the
wood stock.
If a deeper cut is to be made, turn the Acme Screw Knob (8) clockwise. If a thinner cut
is to be made, turn Knob counterclockwise. As an estimate, each full turn of the Knob
equals about 1/8 inch.
Caution: Always be aware of the depth of the mounting screws so the saw blade does
not come into contact while cutting the wood stock.
Up to 16 screw holes to
mount wood stock
Band Saw Head
Table Guide Slot
Mounting Plate (6)