


Page 5SKU 92372 For technical questions, please call 1-800-444-3353.
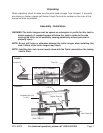
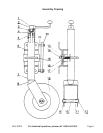
Refer to FIGURES 1 and 2 on page 4, and the Assembly Drawing on page 8.
1. Slide the Handle (1) over the Shaft and secure it with the set Screw (2).
2. To mount the Tire (18): Slide the Axle (10) through a Washer (9), the Inner Tube (8) Left
Bracket, a Spacer (11), the Wheel, the other Spacer (11), the Inner Tube (8) Right
Bracket, and the other Washer (9). Insert a Cotter Pin (12) through the axle on each
side, and bend both over completely to secure.
3. Measure the trailer tongue for the best location to mount the Jack. Remember that,
while in its storage position, the Jack must not interfere with the Vehicle or trailer when
turning or passing over speed bumps, boat ramps, etc.
4. Pull on the Swivel Handle (15) to adjust the Swivel Plate (6), so the Jack is in the
lowered position.
5. Hold the Jack against the trailer tongue while using the Jack Handle (1) to lower the
Tire (18) to the ground.
6. Using the four Hardware Sets (19) and two Mounting Bars (20), attach the Jack to the
trailer tongue. The Mounting Bars must run across (perpendicular) to the trailer tongue.
NOTE: You may wish to use some removable thread locking compound (not included)
on the bolt threads to help secure them.
7. Test the operation of the Trailer Jack. Make adjustments if necessary.
8. Tighten the Hardware Sets (19) firmly and evenly.
Assembly / Installation (continued)
Operation
Dismounting The Trailer from The Towing Vehicle.
WARNING: Before dismounting, make sure the trailer wheels are properly chocked to
prevent the trailer from rolling. This procedure requires at least 2 people to
be present.
1. With the trailer on the hitch, pull the Swivel Handle (15), and rotate the Jack downwards.
WARNING: Keep your fingers away from the Swivel Plate area (See FIGURE 2),
and do not allow the Tire (18) to strike your foot as the Jack rotates downward.
2. Assure that the Swivel Handle pins are in place, locking the Jack into the lowered
position.
3. Rotate the Handle (1) counterclockwise to lower the Tire (18) to the ground. Continue
to crank just enough for the Trailer Jack to take the weight of the trailer. This will make
it easier to disengage the trailer hitch.
4. Disengage the trailer hitch. Remember to disengage any safety chains, electrical
connections and other connections between the vehicle and the trailer.
5. You may need to extend the Jack further to clear the trailer hitch. When the vehicle is
completely clear, and it is safe to do so, drive the vehicle away from the trailer.
WARNING: Be sure to have 2 spotters watch this operation to be sure the trailer is clear
of the vehicle, and that the trailer does not roll away.