


28
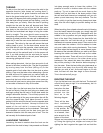
line while slowly leaning back away from the trampoline.
Lean to approximately 45 degrees for best leverage. As
the mast and sail lift out of the water and the upper hull
begins to drop back into the water, drop down to your
knees then into the water. Hold onto the righting line
near the crossbar or the crossbar itself near the hull that
you were standing on. This will prevent the hull from
being lifted into the air by momentum which could cause
the boat to capsize once again. Be well aware of the hull
and crossbar coming down over your head. Holding the
crossbar or righting line will also insure that you remain
with the boat when it is righted. Climb aboard and
continue sailing. Be well aware of the hull and crossbar
coming down over your head. Holding the crossbar or
righting line will also insure that you remain with the
boat when it is righted.
DOCKING
Docking the Getaway properly will prevent damage.
Always dock and rig on the leeward side of a dock (the
side the wind reaches last). Come in slowly and always
be aware of the wind direction so you can properly de-
power the boat when needed. The stronger the wind the
more difficult the docking will be. Until you feel
confident, you may want to practice with a friend who
will remain on the dock and help slow you down if
necessary.
BEACH LANDINGS
Landing on a beach is simple. The idea is to reach the
beach in the point of sail nearest straight into the wind
as possible. This will assure that you can properly de-
power the sail once beached.
Approaching a beach when the wind is blowing from the
beach out towards the water will require some planning
so that you maintain power. Turn into shore just before
the hulls or rudders touch bottom. Plan so the final tack
towards the location you choose to land is the tack that
is nearest straight into the wind. Get a little closer to the
beach than you need on the pervious tack to account for
wind shifts in direction and speed. This will give you a
little room for error. This will allow you to point a little
further away from the wind after the tack to gain speed
before heading up into the beach to de-power at the last
moment.
When approaching a beach when the wind is blowing
onshore, sail in towards the beach from either side of
the landing spot. Sail in just short of touching the bottom
with the rudders. Allow some distance to turn the boat
out towards the water and into the wind just out from the
landing spot. Turn sharply to head into the wind and
stall the boat. Raise the rudders and drift back onto the
beach. Always keep the boat pointed into the wind
while beached and keep the sail trimmed out and un-
cleated.
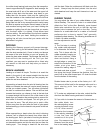
RUDDER TUNING
You may adjust the rake of your rudder blades on your
Hobie Getaway. The amount of rake in a rudder blade
affects the "feel" at the tiller. Basically, more forward
blade rake neutralizes the pull on the tiller and less
forward rake increases the pull on the tiller. Tuning
blades for a comfortable feel is a matter of individual
preference but a close to neutral "feel" generally
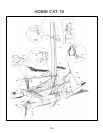
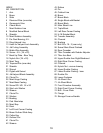
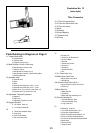
provides the best steering. The following sketches are of
a Hobie 16 rudder assembly
but the adjustments are the
same.
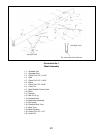
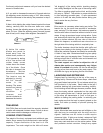
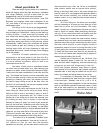
1) The first step in making
any rudder rake adjustment
is to determine the existing
rake. This is done with the
rudder assembly hanging on
the boat's transom, blade
down and locked. Using a
straight edge or snap line,
extend the centerline of the
rudder pivot pins down,
across the leading edge of
the blade and draw a pencil
line along that length. Measure the distance from the
pencil line to the most forward spot 12" down the blade
from the bottom of the casting.
Rudder blade rake is pre-set at the factory to 1-1/8".
This amount will be best for the average sailor and is a
good starting point from which to begin any
adjustments.
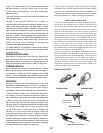
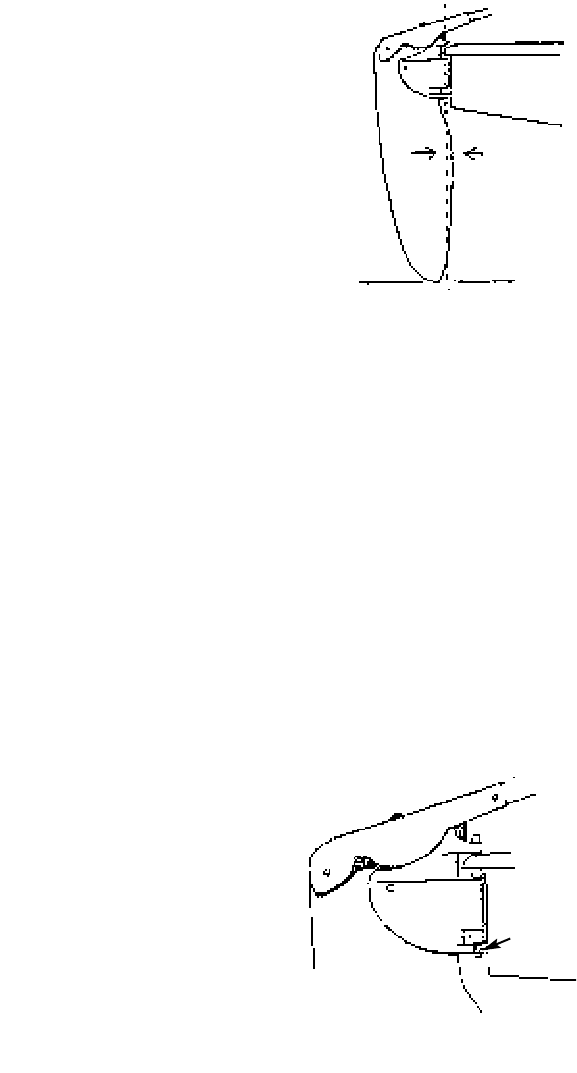
2) To make any adjustment to the rake, unlock the tiller
arm from the rudder housing and leave it unlocked.
3) If you wish to increase the amount of forward rake in
the rudder blade, turn
the rake adjusting screw
counterclockwise using
a 3/16" Allen wrench.
Determine the increase
in the rake by extending
a new line from the
centerline of the pivot
pins. Re-measure the
distance from the pencil
line to the leading edge.
1-1/8"
Aft for more pull on
the tiller
Forward for less
pull on the tiller
12"
Screw
Sketch B