


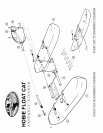

FLOAT CAT 60/75 PARTS LIST
ITEM DESCRIPTION
(1) Two pontoons
(2) Two black plastic vent caps
(3) Two aluminum crossbars with snap buttons
(4) One plastic molded seat back
(5) Two 10” aluminum seat posts with plastic C clamps
(6) Two seat post screws 3/4” Phillips
(7) One seat back adjustment system:
(7a) One 1”x56” nylon webbing straps with male buckles
(7b) Two 6” sewn webbing loops with female buckles
(7c) One 3” sewn webbing loop with female buckle (buckle for cooler accessory)
(8) One black mesh grommeted seat bottom with blue foam wedge cushion
(9) Three black seat lacings: two short and one long
(10) One safety tether leg strap (Not Shown)
NOTE: Rowing System, 75 Cargo Deck and 75 Expedition OWNERS... Rowing system assembly step #1, and
cargo deck installation #1 and #2 (installation of footrest hangers) should be completed during the initial
assembly of your Float Cat. Those steps are included here and denoted for you. Refer to the rowing system
assembly and cargo deck assembly sections of this book for identification of parts and remaining steps.
(SEE ALSO: Large Diagrams Pg. 18-19)
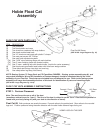
FLOAT CAT 60/75 ASSEMBLY INSTRUCTIONS
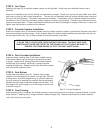
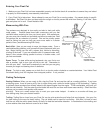
STEP 1- Pontoon Placement
Note: The seat faces the rear or aft of the boat
(sometimes refered to as the "stern"). The front of the boat is refered to as the "bow". Float Cats are paddled or
rowed with your body facing aft (with your back to the direction of travel).
Float Cat 60: Both pontoons are exactly the same. Forward refers to the pointed end. Rear refers to the rounded
logo end. Position pontoons facing the same direction with the side Hobie diamond logos facing out.
.
Hobie Float Cat
Assembly
Forward / Front
Bow
Aft / Rear
Stern
4
Float Cat 60 Shown
(SEE ALSO: Large Diagrams Pg. 16)
HOBIE LOGO ON THIS SIDE