


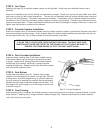

STEP 2- Vent Caps
Installing vent caps (2) as supplied creates a water and air tight seal. Screw caps onto threaded holes on top of
pontoons.
Caps can be installed to self vent for altitude and temperature changes. To self vent, remove the clear plastic cone inside
each cap by prying out with a small screwdriver. The cap will not completely seal and venting will take place as long as
the cap is not over tightened. The plastic cones may be reinserted. Temperature and air pressure changes may cause
contraction of the air inside the pontoons, possibly resulting in dents in the pontoons. Pontoons may become hard as air
pressure increases inside. In either case, these conditions do not affect the strength or integrity of the boat. Loosen and
tighten caps periodically to equalize the air pressure.
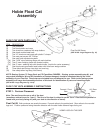
STEP 3- Forward Crossbar Installation
Insert one crossbar (Item 3) into forward molded opening of either pontoon, located by pointed end. Depress snap button
and continue sliding crossbar through. As the crossbar enters the outside molded opening the snap button will pop into
the first snap button hole. Do not insert crossbar into second pontoon at this time.
STEP 4- Rear Crossbar Installation
Insert remaining crossbar (Item 3) into other molded opening
of the same pontoon just far enough to expose the crossbar
in trough. Locate one 6” webbing loop with a female buckle.
Holding loop by the buckle, place loop in trough and slide
crossbar through loop. Depress snap button and slide crossbar
until snap button pops into place.
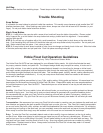
STEP 5- Seat Bottom
Locate mesh seat bottom (Item 8). The blue foam wedge
inserted in the seat sleeve has a black X on one side. With the
X facing down, and Velcro edges facing up, slide the seat over
the rear crossbar by inserting the crossbar into the seat sleeve
between the thick edge of the foam wedge and the mesh. The
thick edge of the foam wedge is cut in the shape of a half circle
to ensure a snug fit.
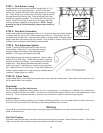
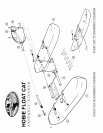
STEP 6- Final Framing
Insert exposed ends of crossbars into molded openings in second pontoon just far enough to expose crossbar in trough.
Place second 6” webbing loop in trough and slide crossbar through loop. Depress snap buttons and slide crossbars
until snap buttons pop into place.
Part 7b 6” Loop Placement
Trough
5
NOTE: IF YOU HAVE PURCHASED THE ROWING SYSTEM UPGRADE KIT, IT WOULD BE
A GOOD TIME TO LOOK OVER THOSE INSTRUCTIONS NOW. THIS WILL HELP SAVE
TIME BECAUSE THERE ARE STEPS FOR THE ROWING KIT THAT SHOULD BE DONE TO
PREVENT YOU FROM HAVING TO PULL THE BOAT APART AGAIN.