


Connecting the outside lines.
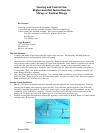
9. Take the down line (with the loop,) lay it over the rudder mount on the right side and through the bail on the
lower part of the rudder mount. Slide the #10 screw retained from disassembly through the loop and screw it
into the hole at the bottom of the transom. Keep the line on the top of the screw. See picture 2
Picture 2
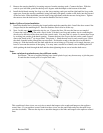
10. Next, with the rudder in the down position, feed each steering line up through the outermost hole in the
rudder horn and (see picture 3) under the washer and around the screw in a clockwise direction. Point the
rudder and the steering handle straight forward, pull a minimum tension into each line and tighten the
screws. It is desirable to have some friction in the steering system so that the rudder does not move from side
to side without movement of the steering handle. The amount of friction is adjustable to the choice of the
owner by tensioning the steering lines. Do not cut off any excess length for several weeks. The lines may
shrink as they age which may require adjustment at some future date. Should the steering lines get too tight,
they will effect the up/down control and make the boat harder to track straight.
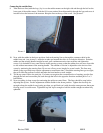
11. Tie the up control line to the steel pin. For better wear against the constant motion of rotating, pass the line
through the hole and around the pin, back through the hole in the opposite direction and then put in 2 or 3
half hitches.
12. Now everything is done except for tensioning the up/down control lines. The lines should be snug before
adjusting the zip ties. Do this adjustment with the rudder in the down position. Tighten the down zip tie
enough to keep the rudder from pivoting up when you pull back on it with about the same pressure that water
flowing across it would create. Tighten the up line zip tie enough to hold the rudder straight out when fully
uphauled.
Picture 3
Revised 2005 3 80018