


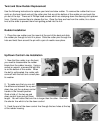

4. WIth the line already passed though the housing, pick up
the rudder section and feed the line though the upper most
hole located along the circular drum. You will notice two
Phillips heads screws very close to one another. Loosen the
screws a few turns and pull the line up and around the forward
most Phillips head screw and tighten it down.
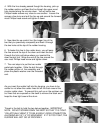
5. Now take the up control line (the longer line of the
two that you previously compared) and feed it through
the two holes at the top of the rudder housing.
6. To fasten this line to the rudder drum, you will pass
the line around the top of the drum and insert the end
through the hole just below where you inserted the
down control line. Wrap the end of the line around the
rear most Phillips head screw and tighten down.
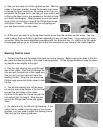
7. The next step is to put the two rudder
parts back together. Slide the bolt through
the rudder portion of the assembly and
place the plastic washer over the threaded
end.
As you insert the rudder half into the housing, you have to be
careful to not allow the rudder lines fall off the track around the
circular rudder drum. To prevent this, pull up on the up/down con-
trol lines that are exposed on the deck to remove the slack and
keep the lines tight around the drum.
Thread in the bolt to hold the two halves together. IMPORTANT
NOTE: DO NOT SCREW DOWN THE BOLT SO THAT IT IS TIGHT.
YOU ACTUALLY WANT IT TO BE A FAIRLY LOOSE CONNECTION
ALLOWING AN 1/8”-1/4” OF MOVEMENT. IF IT IS TOO TIGHT, THE
RUDDER WILL NOT GO UP PROPERLY.
LOWER HOLE
UPPER HOLE
Pull up on these
lines here.