


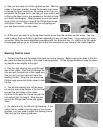

Steering Control Lines
1. The two lines that exit the sides of the boat are for the steering. Before running the lines to the rud-
der, place the steering handle in the close to center position. On the Mirage Adventure, keep the steer-
ing handle turned slightly to the right.
2. Run the right steering line up to the right
side of the rudder. Pass the line through the
hole and pull the slack out of the (make sure
that you don’t pull too hard and move the
steering handle). Wrap the line around the
Phillips head screw and tighten down to hold
the line.
3. The left side steering line will be insert-
ed into the hole at the bottom of the bolt that
connect the two halves of the rudder.
Continue to the pass the line up through the
bolt and pull the line taught. Wrap the end
around the Phillips head screw and tighten
down.
4. Go ahead and try the left and right steering. If you
notice that the rudder is turning more or less to one
direction, you may need to adjust the steering lines a
little bit to get the steering balanced.
8. Now you are ready to trim the up/down control. With the
rudder in the down position, loosed the forward most screw
to free up the down control line. By pulling on this line, you
will stretch the Bungee cord in the hull (you may need to pull
a little on the down control line exposed on the deck to help
you stretch the Bungee). What you want to do is pull some
more of the line and wrap it around the Phillips head screw
and tighten it down. This stretch that you are getting will
give you down tension on the rudder.
9. At this point you want to try the up down handle to see how the up down control works. You may
need to adjust the lines further to get them adjusted just way you want them. If you need to get more
up control, follow the same adjustment procedure with the up control line. If it is difficult for the rudder
to disengage and go up, try to loosen up the bolt that connects the two halves of the rudder together.