


Page 4 of 4 67300-XXX (en)
PN 97999-961
67300-C4D 67300-J3D
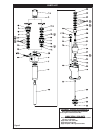
12. Using an open end wrench, tighten (14) upper gland nut.
13. Assemble (3) “O” ring to (2) lower gland.
14. Apply Loctite 242 to threads of (1) solvent cup and (2) lower
gland.
15. Assemble (1) solvent cup to (2) lower gland and tighten, using
a spanner wrench.
16. Apply PTFE tape to threads of (89) bleed valve. Assemble (89)
bleed valve to (88) valve body and assemble (88) valve body to
(6) outlet body. Tighten with outlet of (88) valve body pointed
downward.
17. Secure (6) outlet body and components in a vise, clamping on
ats of (26) plunger.
18. Assemble (54) female packing washer, five (55) “V” packings,
(57) male packing washer and (47) bowed washer to (28) valve
seat, securing with (36) valve seat nut. NOTE: Apply Loctite 242
to threads of (28) valve seat and (36) valve seat nut. NOTE: As-
semble “V” packings with lips facing up.
19. Apply Loctite 242 to threads of (34) valve rod and assemble to
(27) valve seat.
20. Assemble (28) valve seat and components to (26) plunger.
21. Apply Loctite 242 to threads of (34) valve rod and assemble
(34) valve rod thru (28) valve seat and thread into (26) plunger.
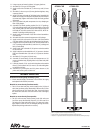
22. Using Wet Sol “Plus”, lubricate the i.d. of (9) tube and the o.d. of
(55) “V” packings and assemble (9) tube over “V” packings and
into (6) outlet body.
23. Apply Loctite 242 to threads of (30) primer rod and assemble
to (34) valve rod.
24. Apply Lubriplate to threaded holes of (15) pressure chamber
body and assemble three (10) studs to (15) pressure chamber
body.
25. Assemble (7) “O” ring into (25) check stop.
26. Assemble (6) outlet body, (9) tube and components to (15)
pressure chamber body, aligning holes in (6) outlet body with
(10) studs.
27. Lubricate threads of (10) studs with Lubriplate and assemble
three (17) lock washers and (12) nuts to (10) studs and tighten
to 300 ft lbs (407 Nm).
28. Assemble (31) primer plate and (32) primer button to (30)
primer rod, securing with (33) lock nut.
TROUBLE SHOOTING
No material at outlet (pump continually cycles).
Check material supply. Disconnect or shut off the air supply
and replenish the material, reconnect.
Material on one stroke only (fast downstroke).
The (21) foot valve body may not be seating in the (22) check
valve seat (see lower pump disassembly). Remove the (21) foot
valve body from the (22) check valve seat, clean and inspect
the check valve seat area. If the foot valve or seat is damaged,
replace.
Material on one stroke only (fast upstroke).
The (27) valve seat may not be seating in the (28) valve seat
(see lower pump disassembly). Remove (27) valve seat from
(28) valve seat, clean and inspect. If the (27) valve seat is dam-
aged, replace. Check for worn or damaged packings and seals.
Replace the packings and seals as necessary.
ARO® is a registered trademark of Ingersoll-Rand Company
Loctite® and 242® are registered trademarks of Henkel Loctite Corporation
Lubriplate® is a registered trademark of Lubriplate Division (Fiske Brothers Re ning Company)