03530515_ed9 3
Product Parts Information
CAUTION
The use of other than genuine Ingersoll Rand replacement parts may result in safety hazards, decreased Starter Relay Valve
performance, and increased maintenance, and may invalidate all warranties.
Repairs should be made only by authorized trained personnel. Consult your nearest Ingersoll Rand Authorized Service Center.
Placing the Starter Relay Valve in Service
NOTICE
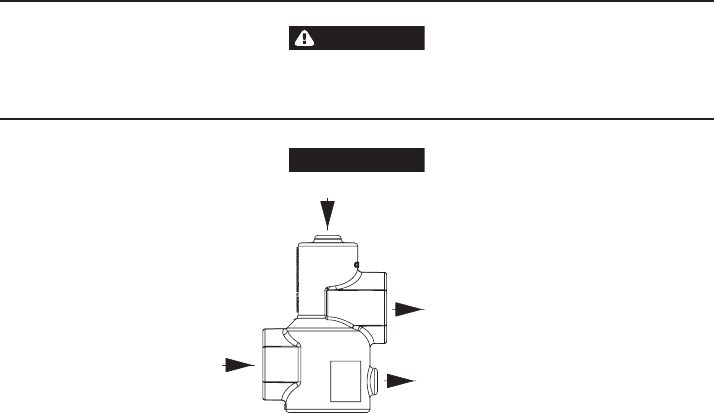
PILOT (ACTIVATION) OPERATION PORT
AIR SUPPLY
TO AIR STARTER MOTOR
TO AIR STARTER CONTROL
VALVE (IF APPLICABLE)
TYPICAL INSTALLATION
(Dwg. 45508561)
This Starter Relay Valve is specially designed and manufactured by Ingersoll Rand for use on Starter installations. Install it in
accordance with the following instructions.
Pre-Installation
Clean the air line, O-ring groove and sealing surfaces to be sure they are free of foreign material.
Ensure that enough space is left for removal and service of this valve.
Ensure that the air line is suitably aligned and supported to avoid strained joints.
Do not over tighten the air line connections.
Starter Relay Valves that have a small drain hole above the “OUT” connection (including SRV125T, SRV150T, SRV150T-LT and SRV150SST-LT)
are to be installed with the drain hole down.
Installation of the Starter Relay Valve (threaded connections)
Use a short pipe nipple between the supply line and the Starter Relay Valve. The nipple should be the same size as the inlet of the Starter
Relay Valve.
Apply No. SMB-441 Ingersoll Rand Sealant to the male thread on the nipple, and install the nipple on the supply line. Tighten the
connection so that it is airtight.
Note that one of the tapped inlets on the Starter Relay Valve is marked “IN”. Thread this inlet onto the nipple and tighten the connection so
that it is airtight.
Apply Ingersoll Rand Sealant to the male threads on the air line that goes to the Starter, and thread this line into the tapped outlet on the
Starter Relay Valve that is marked “OUT”. Make certain the connection is airtight.
Attach the hose from the outlet side of a 3-way normally vented Control Valve to the small tapped hole in the top of the Starter Relay Valve.
Use Ingersoll Rand Sealant on the male thread.
Installation of the Starter Relay Valve (ange connections)
Place the O-ring supplied with the ange tting into the groove on the Starter Relay Valve.
Mount the Starter Relay Valve to the tank using ST500-K166 Flange Assembly. The air ow arrow must point toward the starter.
Check the O-ring to see that it properly seated in the groove to prevent cutting.
Push the two clamp halves inward as far as they will go.
Tighten the four ange bolts in an alternating pattern to 35-45 ft-lbs (47-61Nm) torque.
Attach the air hose from the outlet side of a 3-way normally vented Control Valve to the small tapped hole in the top of the Starter Relay
Valve. Use SMB-441 Ingersoll Rand Sealant on the male thread.
1.
2.
3.
4.
5.
1.
2.
3.
4.
5.
1.
2.
3.
4.
5.
6.


